K.I.S.S. – Keep it simple, stupid. Great advice hurts my feelings every time. Shadow Fiend can be one of the most satisfying heroes in Dota 2 to pull off well, and many a new player has been stomped by that one SF who’s in the mid-lane and grows out of control to stomp the game.
This guide is going to teach you how to become that player. It will give you a clear game plan on what you’re trying to achieve both ability and item wise. Then, once you’ve learned how to keep things simple, you can adapt that game plan to counter your opponents and help your team crush.
Preface
The Keep It Simple Stupid guide will help you lay the ground work for what your builds will look like, and give you the platform you need to play Shadow Fiend and get your experience up.
However, with that said, the following item and skill build suggestions are in-order, but the more you play Shadow Fiend (and Dota in general) and the more experience you get, you’ll come to know that no one builds is going to solve your problems every game.
No two Dota games are alike, and therefore no two builds you work towards in-game should be alike. But for now, keep it simple, and you’ll get there.
Starting Items
Observer and Sentry Wards

We’re playing mid, so we’re getting one of the starting wards. Being a ranged hero is a huge advantage when being able to see across the high-ground, but we need vision in the middle lane for scouting the runes, and for keeping an eye out for ganks.

Ideally we’d like to deny the enemy the same luxury we’re enjoying, so we pick up a sentry also. Try to keep an eye on when the observer ward disappears from your mid-lane opponents inventory, and you’ll have a fair idea where your sentry needs to be to de-ward it.
Grabbing both ourselves, means that we’re spending a bit more gold, but don’t have to rely on the quality of any other player in our supports – which is a great idea when building Dota 2 experience and playing the KISS build.
Tango

With the recent nerfs to how tango sharing works, we’ve had the pull the pin on relying on the shared Tango in the mid-lane and grab our own. Taking damage is often unavoidable, especially with mid-lane harass, so we need a reliable way of returning back the HP lost. So, we get a tango here.
Circlet

If you’ve seen any of the other guides on our website, you’ll know that I am a firm believer in overall stats never been a bad priority regardless of the circumstances. So, we grab some here early. It helps with our early-game livability, because we’re quite squishy until we can secure kills quickly to not take damage.
Mantle of Intelligence

As we’re avoiding the quelling blade, with SF being ranged and therefore not getting the full benefit, we need another method of making your last-hits easier for the KISS mindset. That is where our main-stat item in Mantle comes in, we get a nice boost to our starting intelligence, and boost our damage to make those hits easier – netting us a higher GPM.
Double Mango

Double mango might feel like a weird choice, but only if you haven’t given it a go. We rely heavily on mana, and are playing in the mid-lane. So, mango fits the bill for both of those situations. We get the ability to get off our skills in the even of a dire need, and plenty of regen with the item’s stat stacking.
Early Game Items
Bottle

The bottle is pretty much a must when playing mid, especially with the changes that have released since 7.29 and 7.29b. The bottle was good beforehand in the middle lane (and sometimes the off) and that is still absolutely true here. Gives us the regen we need to survive and win the lane, and can be used to store powerful runes for ganks.
Null Talisman

We’re turning our circlet and mantle in a Null Talisman, this will allow us to get in our last hits easier and will provide some overall bulk to help us survive the more squishy parts of the lane stage of the game. Not that we need the space at this stage, but it will also free up a slot regardless.
Eul’s Scepter of Divinity

We need movement speed and mana. So, we grab Wind Lace (one of my personal favorite items) early, and quickly turn it into Eul’s.
This upgrade provides the utility of the whirlwind also, allowing you to wind yourself to escape and by some time for team mates to come help, or for a cooldown to finish. Or to wind an enemy for your team mates and yourself to catch them, and for your cool-downs to become available.
Eul’s provides all that utility in the active, and the stats that we both want and need as Shadow Fiend.
Build Items
Black King Bar

A core without Black King Bar is not a successful core. If you are a high priority target, that is constantly being stun-locked, silenced, and killed with abilities, then you’re not going to have a very fun game, nor are you very likely to win. So, we pick up a BKB to enable us to ignore things that would lock us down and prevent us from getting in our right-clicks and abilities. Simple.
Blink Dagger

Blink Dagger is great for a few reasons. First, it enables our pounce. That is, we blink in, get off our nuke in Requiem of Souls, and then follow up anything that is left alive. That’s our go to move, and you’ll see throughout the guide that I will refer to this move as the Pounce.
Moreover Blink allows us an escape if we foresee an unwinnable engagement, and a method of catch and/or engagement without the pounce available.
Aghanim’s Shard

So, we’ve begun to seek engagements and take more fights, and go actively looking for ganks as much as possible to snowball into the late-game. What’s next? The damage enhance begins. The shard for SF takes Presence of the Dark Lord’s armor reduction, and adds Magic Resist Reduction. What does that mean? I’m glad you asked.
That means that we’re now viable as both a caster and physical attacker. Our right clicks are dealing heavy damage, our pounce is doing monstrous damage, and our skill follow up is just as painful. All thanks to the shard.
Boots of Travel

Boots of travel means that we can actively seek prey regardless of their location on the map. We’re never missing when the team takes a fight, and we can be everywhere to push lanes and secure kills. Whilst the cost may be heavy, boots in combination with Eul’s means that the enemy will have very little chance of escaping us.
Plus, having the extra movement speed to get around the map never feels like a bad thing, and can be frustrating to play without.
Late Game Items
Arcane Blink

Arcane Blink is a huge power-spike for us. We are pulling off our Shadowraze with such rapidity, that the enemy will so often all be on the death timer themselves, that you will have to find things to do in between their spawns. More Shadowraze and more Pounce with Requiem of Souls? Yes please.
Once you get Arcane Blink, you get a huge boost to your abilities. They’re getting off sooner, and more often – that is just as potent as it sounds. Plus, we get to add a stat in intelligence to our blink.
Aghanim’s Blessing

If you’re not struggling for space, then absolutely keep the scepter in your inventory for the additional stats. Like I mentioned earlier on in the guide, overall stats is never a bad thing and you will never regret investing as such.
However, when I find myself snowballing and taking control of the game with Shadow Fiend, I can quickly become six-slotted and need the space. If you find yourself in a similar situation, eat the staff with the blessing.
Aghanim’s is another HUGE power-spike for us. It increases the number of souls stored, and therefore the potential damage ceiling for your pounce. It also means that your Requiem will travel back towards SF after casting, and will heal you for all the damage dealt on the way back. A huge damage boost, and healing with our best combo? Simply powerful.
Windwaker

Love means never having to say you’re sorry. Windwaker means never having to mana manage. It takes everything that is amazing about Eul’s Scepter, and turns it up to eleven. Our chase and mobility around the map is now unmatched, we can save allies and punish enemies alike, and can face-roll the keyboard to spam our abilities without ever watching the mana bar.
Luxury Items
Abyssal Blade

We’ve got decent range, and our right-click are amplified heavily by our agility and the passive in Presence of the Dark Lord. Adding Abyssal Blade to this armor reduction makes our physical presence just as terrifying as our magical. Whilst we don’t get the highest possible chance for the stun proccing, we’re still get A chance for it to occur, and are augmenting our already potent right-click potential.
Octarine Core

Octarine combines extremely well with Arcane Blink. Meaning that if we want to use something, we’re never having to wait for it to be available. It takes everything that we already have going for us, and turns it up to eleven. You’re going to be able to blink in, and spam to your hearts content without nary a thought of mana management thanks to WW, and nary a thought to cooldowns with Arcane Blink and Octarine Core.
Skills
Shadowraze
For those unfamiliar with how Shadowfiend works, level any of the options for Shadowraze will level the skill across all your options. Near or far, if you level one, you level them all. Experimentation and key are key in learning which Shadowraze will suit your situation, so take some time in the hero test screen, and play around with hitting creeps and dummy targets with each distance of Shadowraze.
The skill has a relatively low cooldown and mana cost, so don’t fret if you miss your target and want to try again, or want to try a different distance. Using each the Shadowraze options is they key to dealing heavy damage with SF, and the raze ability. It is key to remember that each connection with Shadowraze will increase the damage of the next, so use them often, and in conjunction with one another to reach the maximum potential of the skill.
Necromastery
Nerco is what makes our Pounce combination so potent, and will also enable you to play SF as a right-click damage dealing hero. The more souls you have, the more damage you do. Hold onto them and burst heroes down with your huge right click damage in combination with Abyssal Blade.
Or, build them up and unleash them with your pounce combo, in combination with your items like Aghanim’s Scepter and Arcane Blink.
Presence of the Dark Lord
Presence is what can make you viable as right-click monster. It reduces the amour of those around you, that means when entering a fight or entering a team fight, the enemy is already at a disadvantage just by having you present. That’s a great start, but the aura can also be upgraded with the shard to include a magic resistance reduction.
What does that mean? It means that both you and your team are dealing much more damage with BOTH your right-clicks and physical damage, AND magical damage, just for having you nearby.
Requiem of Souls
Once we hit six, this is where the pounce mechanic of playing Shadow Fiend comes in. We built up souls by killing creeps, then we blink in and dump them on some poor unsuspecting fool. You can aid the timing of getting off the blast also, by using your Eul’s Scepter or Windwaker, to cyclone an enemy and then follow up with your nuke.
Don’t forget, we’re also upgrading this with the scepter. So, not only is it our nuke, it will heal us with the backwards traveling blast also. Build up souls, jump in, kill whatever is around, rinse and repeat. It’s that simple. KISS baby, kiss.
Talents
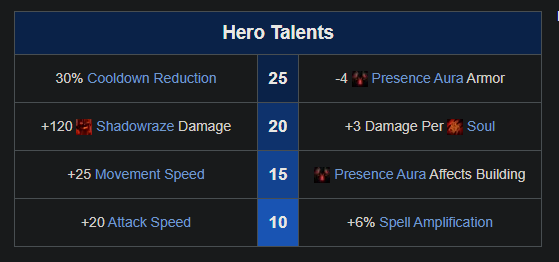
Level 10: +6% Spell Amplification
As the build we’ve based the entire guide around is about spamming abilities, and nuking heroes down quickly, we’re going to pick up spell amplification. That doesn’t mean that attack speed doesn’t have a place in right-click builds, but with what we’re going with here, the right-click damage is more of a bonus than a focus. So, we get spell amp.
Level 15: +25 Movement Speed
Simply because the other option isn’t that flash. Your first priority is rarely going to be siege, and when you are sieging, very rarely are you going to be alone or need to worry about the pace in which the HP of the siege drops. So, we improve our already fantastic movement speed from Eul’s and Boots, with a talent.
Level 20: +120 Shadowraze Damage
Again this talent entirely depends on what style of play you’re going with SF. If you’re going a fast throwing of right-click build, then yes you take the soul damage, but we’re not. Octarine core and Arcane Blink mean that we’re spamming spells and we want the most out of them, so we take the Shadowraze damage.
Level 25: 30% Cooldown Reduction
Between Arcane Blink, this talent, and Octarine core you will never want a spell, and not be able to cast it. We’re taking this talent for all the same reasons we took our level 10 and level 20 talents – to be a more potent caster.
Credits.
| Program | Founding Writers |
| Author | Luke Cowling |
| YouTuber | Dota 2 High School |
| Publisher | MGN |
| Game | Dota 2 |