The summon feature has been a mainstay in the final fantasy series for a very, very long time and the twelfth entry into the series is no exception. Summons are referred to as an Esper in FF12: The Zodiac Age, and each represents a different sign on the Zodiac calendar, plus a 13th bonus!

This guide will walk you through finding each of the available summons, and a general strategy on how to defeat them by exploiting their weakness and preparing your team members for the battle ahead.
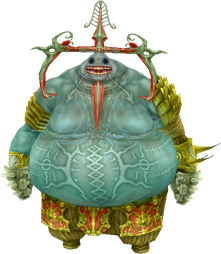
Esper One: Belias, the Gigas.
Belias will be the first Esper you encounter on your journey through FF12: ZA and can be located at the Tomb of King Raithwall during the story.
Belias is the fire Esper, and therefore as you can guess much of his damage is based around … fire. As such, you won’t want to be using and of your fire-based magic or have any of your gambits set to automatically use any fire-related spells.
Instead, stick with Aqua for damage, Slow for utility, and Shell for protection and you should have your first Esper taken care of in no time!

Esper Two: Mateus, the Corrupt
Meteus will be the second Esper you counter, and can be located Stilshrine of Miriam, as the story of the game progresses.
Mateus is the Esper of Ice, so naturally avoid using Ice related spells. At the beginning of the battle, the boss will some five helper elementals that will spam your party with ice spells and sleep, so take care of these little blighters first to avoid the headache – they are weak to thunder abilities!
As for the boss herself, well using your first Esper in Belias is never a bad idea. And having the Ice Shield equipment on your tank will go a long way into surviving the fight to get your damage off. But be careful with spells, and Mateus will have reflect up, so stick with physical attacks to burst her down!

Esper Three: Adrammelech, The Wroth
Adrammelech is an optional Esper located in Zertinan Caverns, available after reaching the Osmos Plain.
Much with the others, Adrammelech is also represented by an element and his is thunder, so avoid using that type of magic and equip expecting to cop plenty of thunder magic. His thunder spells also have a change of inflicting your party with the Stop status, so ensure that you are bringing plenty of Chronos Tear, or Remedies. Equipping the party with the Power Armlet will mitigate the status entirely.
If you stick with ice based elemental damage and remember that you can heavily damage the corpses that summon by healing them, you’ll have the elemental summon in your arsenal in no time!

Esper Four: Cúchulainn, the Impure
Cuchulainn is another optional summon, this time located in the Garamsythe Waterway provided that you have both level one switches activated, and number four and three.
Cuchulainn’s gimmick is that his stenchy aura will constantly deplete the HP of you and your allies, which is unavoidable. So, ensure that you have gambits set up to be replenishing your ever-depleting HP bar. Having bubble and AOE healing will go a long way in preventing the boss from getting you down quickly. Cura, regen and bubble should be high priority gambits on any hero that has the license.
The boss’s other key component is the Disable attack. So, you will need to ensure that some (if not all) of your party members are wearing a Black Belt. Those with the belt should be a gambit to heal the status effect with hi priority.
Esper Five: Zalera, the Death Seraph
Zalera is another optional summon, to be found with by using the Barheim Key through finishing the wounded solider, cactus flower side-quest. Travelling to the end of the Barheim passage will net you a fight with the next optional Esper.
This fight in unique in that a time will start at the beginning of the fight, and should you fail the DPS check, you will need to try again. Whilst Zalera does not have many abilities, they will constantly try to instantly KO the party. The key ability for this is called Prime. Lv Death, which will instantly KO any party manly whose level is a prime number.
Ensuring that you’re properly equipped for the fight will go a long way too, to prevent the stop and sleep status effect ensure that at least your status clearing party member is equipped with the Nishijin Belt, or the Black belt. Then, with them immune to status effects, you can get off your status clearing items and spells.

Esper Six: Exodus, the Judge-Sal
The next available Esper is also optional, and can be obtained once the player has reached the Phon Coast. To fight Esper, one must activate the shrines located Mosphoran Highwaste to make the plants above float. Once those plants are floating, you’ll need to tempt the nearby Chocobo with some Gysahl Greens and follow the plants to Exodus’ location.
A unique twist to the Exodus fight is that the player will not have access to the ‘item’ command during the fight, this will likely the first time that the player has encountered this mechanic unless they are obtaining Exodus very late into the game. So, ensure that you have gambits of Ensuna and healing to mitigate the loss of healing and curative items.
The crux of this fight will be to spread your party members out, as Exodus most powerful attacks are all AoE, and you do not want every party member taking what could only be absorbed by your tank – potentially.
For DPS, stick with physical attacks as Exodus will cast reflect on itself once it is HP has reach 20%. This can technically be dispelled to allow you to cast magics, but the boss will counter such attempts to remove it’s Reflect with powerful spells.

Esper Seven: Zeromus, the Condemner
Zeromus is the next optional Esper, and one of the easiest to locate. All the player need to is retrieve the Stone of the Condemner from one of the religious NPC’s located near the Temple in Mt Bur-Omisace. With that stone, use the waystone at Stilshrine of Miriam where the player received their non-optional Esper.
The condition of your fight with Zeromus is that you will not be able to cast magic for the duration, and as such you will need to rely on items for elemental damage, healing, and the curing of status afflictions. So, ensure that you’ve made a visit to the general items stores before the fight.
Zermous will attempt to inflict your party with the Stop status effect, so ensure that at least your status curing party member has the Power Armlet, if not your entire team. Elsewise, the battle is pretty straight forward with Zeromus not really resisting any of your DPS.

Esper Eight: Shemhazai, the Whisperer
The next Esper will not be optional, and will be fought as the player ventures through the Giruvegan portion of the story, so there’s no fear on missing out on this particular summon. Shemhazai will heavily rely on magic to damage your party, so having the shell shield, or shell buff uptime quite high will go a long way into surviving the fight.
Elsewise, she will also attempt to inflict your party with silence and disease status effects. Ensuring that your tank or healer party member has gambits to remove these effects is very important, as leaving either unattended is a surefire way to attend the game over screen quickly.

Esper Nine: Chaos, Walker of the Wheel
Chaos is the next, and one of the most powerful, optional Esper. To challenge Chaos, one must first complete the three medallions side-quest, and have fought the other door-bosses within the Necrohol of Nabudis. With those defeated, one can enter the ‘The Crucible’ to challenge Choas.
The condition of your fight with Chaos is that none of your party member will be allowed to use the ‘attack command’, and you will therefore be forced to used technicks, mist, magic or summons. However, there are some ways around this for your physical DPS. The first being the telekinesis command, and the second being the Gill Toss Technick.
If the player has finished the license boards for their characters, which is easily doable by this point in the game, then they will likely have the cat hood accessory set up on one or multiple characters to convert the excess license points into GIL. This will allow the player to spam a max-power Gil Toss, which makes short work of Chaos.

Esper Ten: Hashmal, Bringer of Order
Hashmal is another non-optional Esper boss, and will be encounter as the player continues through the story until they reach the Third Ascent of the Pharos at Ridorana, and will be found in a room called Heaven’s Challenge.
The bubble buff and bubble belt will help a lot with this fight, as Hashmal will constantly attempt to inflict your party with the Disease status effect with each of his regular attacks. Ensure that you’re either stocked up on Serum, or having the bubble up, to prevent getting disease+attack combo’d onto the game over screen.
Hashmal’s main damage will come from the earth magic spell Quakeja, but this fight can be made trivially easy by using items or spells that will buff your party with the Float effect. Using float combined with bubble will ensure that Hashmal goes down without a headache.

Esper Eleven: Famfrit, the Darkening Cloud
There is no fear in not encountering Famfrit, as this Esper is another non-optional and will be obtained once Cid is defeated after he has summoned the Esper himself. Once Cid has been lowered to 50% health, he will used the manufactured Nethicite to summon Famfrit and you will need battle both.
Both Cid and his summon are weak to fire spells, so using Oil combined with fire-based weapons and spells will ensure that whenever you land a hit, you are dealing big numbers in damage. This will bring down both their health-bars quite quickly. Elsewise, the summon adds very little to the fight and should be easily countered with your status removing gambits or echo herbs at the least on your status removing spell-caster.

Esper Twelve: Ultima, the High Seraph
Ultima is the second to last Esper we will obtain, and can be found within the Great Crystal, and accessible once the party has the Treaty Blade. Travel through the great Crystal, to the Crystal Peak to challenge Ultima.
Her gimmick is that each time the player damages Ultima, they themselves will also be damaged. Ensure that you have plenty of options when it comes to healing when challenging Ultima. A mechanical approach with potions, and a magically approach with curing spells, works better when using both. If a little healing is good, more must be better!
Whilst the beginning of the battle might seem easy, once Ultima reaches 70% HP left, she’ll begin to change the battle on a rotation and screw with your gambits. Disabling your gambits and adapting to each paradigm manually will be your best bet here, and before long, you’ll have her down and available as a summon!

Esper Thirteen: Zodiark, Keeper of Precepts
Zodiark is the final Esper available, and the only to fall outside the traditional Zodiac signs – being represented by a snake. Zodiark can be found within the blocked off section of the Henne Mines, once the player has at least 10 other Espers. However, be warned, as the enemies leading up to and including Zodiark are of a very high level and will probably require some griding to defeat.
The boss’ initial attack will always be Darkja, and they will continue to cast the spell throughout the fight. If you’re finding the damage hard to mitigate, consider adding the Black Mask to your list of equipment. This will help with the damage, but not the chance to instantly KO. This chance is about 50%, but it can be reduced with the shell shield or by manually casting shell on your characters before and throughout the fight.
Elsewise the Zodiark fight is much the same as many others in FF12. Spells (non-elemental are best) when the boss is physically immune, ensure that you have plenty of status curing items, or gambits to remove them through spell use. And that’s about it, if you’re appropriately levelled, there’s nothing too challenging or frustrating to this fight as long as you aren’t chaining the instant KO’s.

Credits
| Program | Founding Writers |
| Author | Luke Cowling |
| YouTuber | XCV |
| Publisher | MGN |
| Game | Final Fantasy 12 – The Zodiac Age |