K.I.S.S – Keep it simple, stupid. Great advice, hurts my feelings every time. Weaver is renown for being one of those heroes that is just impossible to lock down. His play-style is fast and furious, and this agility can be intimidating or overwhelming to players who have seen a Weaver dominate in their game, but have been unsuccessful in replicating that performance in their own games.

This guide is aimed at keeping things simple with Weaver, and will give you a clear game-plan on what you’re trying to achieve ability and item wise. Then, once you’ve learned to keep things simple, you can adapt that game-plan to counter your opponents and accentuate your team.
Preface.
Preface:
The Keep It Simple Stupid guide will help you lay the ground work for what your builds will look like, and give you the platform you need to play Weaver and get your experience up.
However, with that said, the following item and skill build suggestions are in-order, but the more you play Weaver (and Dota in general) and the more experience you get, you’ll come to know that no one builds is going to solve your problems every game.
No two Dota games are alike, and therefore no two Weaver builds you work towards in-game should be alike. You’ll want to adapt to the draft – both theirs and your own, and the way both teams are playing and how the game is unfolding.
But for now, keep it simple, and you’ll get there.
Starting Items.
600 Gold.
Tango. 600-90=510 Gold.
You’re going to want regen for the laning phase, it’s as simple as that. You’re going to take early damage, it’s unavoidable. Whether from harass, contesting runes, mistakes, whatever. You’re going to want your HP back, and tango is going to get it for you.
510 Gold.
Double Iron Branch. 510-100=410 Gold.
We’re pretty squishy early, and iron branch provides some general beef and can be used in combination with the tango for extra healing. The stats are good, and the branches build into wand later, if we have them left.
410 Gold.
Circlet. 410-155=255 Gold.
We’re taking Circlet for many of the same reasons that we pick up the branches – overall stats, and builds into something useful. We get +2 all stats, which helps with our early suvivability and with getting last hits off. It’ll also build into Wraith Band shortly.
255 Gold.
Slippers of Agility. 255-145=110 Gold.
Slipper gives Weaver more armour early, and a bit of extra damage. We can take a few right-clicks before worrying, and get off our lasts hits. It’s also another ingredient in Wraith Band, and speeds up our acquisition having Slippers with our starting gold.
Enchanted Mango. 110-70=40 Gold.
Mango gives us a little bit of both, when it comes to regen. We get some additional regen to be used in combination with our tango to have full. Can be eaten in cases where you desperatly need to get a skill off. You need an escape, or secure a kill that will put you ahead, eat the mango.
40 Gold Surplus.
Early Game. (In-Order)
Wraith Band.
“+ 5 Agility + 2 Strength + 2 Intelligence + 5 Attack Speed + 1.5 Armor”
Like I mentioned in the starting items, we’re going to get Wraith Band pretty quickly considering that we have most of the ingredients from our starting items. We bump up the ease of our last hitting potential, and get some attack speed to help too. We’re annoying our opposite laner and using the gains to improve our farm.
Blight Stone.
“Passive: Lesser Corruption
Your attacks reduce the target’s armor by -2 for 8.0 seconds.”
Blight stone early can be devastating to your laning opponents and ensure that you start off by dealing big numbers, stripping the enemy of their little armor. Can even be considered as a starting item if you want to move starting gold around and get Wraith Band a little later. Your call. Hold onto it, as we’ll build it into Desolator later.
The armor strip absolutely stacks with your Swarm, devastatingly simply.
Power Treads.
“+ 45 Movement Speed + 10 Selected Attribute + 25 Attack Speed
Active: Switch Attribute
Switches between +10 Strength, +10 Agility, or +10 Intelligence.”
Power Treads are the way to go on Weaver, early boots wise. Treadswapping is just far too valuable a utility to pass up in our early game items. We have extra damage when we need it, we can regen mana if we’re struggling with mana management early, and we can use them to help survive ganks. Swap as you need.
Little tip: the starting stat is based on whatever item you used to complete the treads – it doesn’t need to be the strength belt. It can be the Band of Elvenskin, or the Robe of the Magi.
Dragon Lance.
“+ 14 Agility + 12 Strength
Passive: Dragon’s Reach
Increases attack range of ranged heroes by 140.”
Dragon Lance isn’t the most commonly picked item on Weaver, but the sake of the KISS build, I really like it. We get plenty of beef with the strength and armor, but the passive means that our positioning is quite forgiving, because we’ve got an extra 140 units of breathing room.
Forgiving positioning, and longer range kills, simple.
Build Items. (In-Order)
Maelstrom.
“+ 24 Damage
Passive: Chain Lightning
Grants a 30% chance on attack to release a bolt of electricity that leaps between 4 targets within a 650 radius, dealing 140 magical damage to each. Lightning proc pierces evasion.”
Maelstrom is a farming item, meaning that it enables and accelerates our ability to amass gold. We get an extra +24 damage each attack, and we get some more AoE. This, combined with your Shukuchi means that you’re clearing creeps in whatever form, much more quickly.
More money, more AoE, simple.
Order Note:
The next two items can be exchanged in their order of importance. If you’re getting locked down a lot early, or fear for a nuke, grab Linken’s first. If not, and you’re playing freely and want to secure more kills to snowball, grab Desolator first.
Linken’s Sphere.
“+ 14 All Attributes + 7.0 HP Regeneration + 5.0 Mana Regeneration
Passive: Spellblock
Blocks most targeted spells once every 12.0 seconds.
Active: Transfer Spellblock
Temporarily removes Spellblock from the item’s owner and transfers it to an allied unit for 12.0 seconds. Range: 700″
Linken’s Sphere is a huge powerspike in terms of survivability for us. +14 all stats means that we get a huge bump to our HP pool, and our regen. With that comes much more mana, more regen, so that we can liberally use Shukuchi at whim. Plus, we get more armor and damage to boot.
Additionally, we get the spellblock. Those huge targeted nukes that can potentially bring you down quickly? That click to disable skill that the enemy support has been aiming at you? Blocked.
Blocked without you needing to do a single thing, as the effect is passive and only has a 12 second cooldown. Passive, simple. Nice.
The spellblock can be activated to pass it to an ally, if you see that big Sniper bolt, or Lina blade coming and want to be a pall.
Desolator.
“+ 55 Damage
Passive: Corruption
Your attacks reduce the target’s armor by -6 for 7.0 seconds.”
The third and final piece to the puzzle that is our ‘build items’, is Desolator. And again this item is another large powerspike for us item wise. It turns our abilitiy to secure kills up to eleven. The damage boost is huge, and the armour reduction synchronizes well with our swam bugs.
So, we’re dropping their armour with our bugs, zipping around getting ontop of the enemy, kiting them. We’re dropping their healthbar quickly now, and they can’t lock us down. We can hit them from afar with our attack range, and with Desolator, every attack HURTS.
Hurting the enemy team is good, simple.
Late Game Items. (Situational Order)
Order Note:
I’ve mentioned the list here for late game items to consider is in situational order. The reason for this is that you’ll want to tailor the priority on what the enemy team is playing, and what you’re struggling with, or what you want to improve.
If they’re playing high mobility, or high lifesteal carries, and you find your team struggling to lock them down, and you need to slow them down whilst Desolator does its work – go with Skadi.
If they’re playing heroes that are bursting you, and you find you can’t get enough rewinds in, or escape enough and you want a third life and hefty HP back – go with Satanic.
If they’re playing a heavy casting build, with lots of things you want to avoid whilst you burst down their squishes, Linken’s is constantly on cooldown, or not helping enough with ground targeted spells – go with BKB.
Eye of Skadi.
“+ 25 All Attributes + 200 Health + 200 Mana
Passive: Cold Attack
Attacks lower enemy movement and attack speed and reduces heals, health regeneration, lifesteal and spell lifesteal by 40% for 3.0 seconds. Slows enemy ranged units by -50% movement speed and by -50 attack speed. Slows enemy melee units by -25% movement speed and by -25 attack speed.”
Overall stats is always good, all the time. Kill potential, survivability, and mana manament. All turned up to eleven with Skadi with the overall stats. But where the item really shines is in it’s passive – Cold Attack.
The passive is so crippling. They wont be able to retreat from your assault. You can always be on the enemy, always dishing out your crazy attack damage. They wont be getting life back, and their attacks will be few and far between.
Cold attack is so demoralizing for the enemy, as it really disables their ability to do anything about you being on top of them, bursting them down, kiting them, and slipping away.
Black King Bar.
“+ 10 Strength + 24 Damage
Active: Avatar
Grants Spell Immunity. Duration decreases with each use.
Duration: 10.0 / 9.0 / 8.0 / 7.0 / 6.0 / 5.0 Dispel Type: Basic Dispel”
Black King Bar is very, very rarely a bad idea on carries, or on most heroes for that matter. It allows you to do your Weaver things with impunity. For that duration, you need not worry about spells interrupting you jumping in and taking people down quickly.
If you find that Linken’s is often on cooldown, or you’re being frustrating by spells that aren’t targeted, then prioritize BKB quickly.
Satanic.
“+ 25 Strength + 55 Damage Active: Unholy Rage
Increases Lifesteal percentage to 200% for 6.0 seconds.
Passive: Lifesteal
Heals the attacker for 25% of attack damage dealt.”
Satanic potentially gives us a third life. We have our first healthbar. We have rewind. We have satanic. It is going to make you mind-numbingly frustating to fight. Just when the enemy thinks they have finally locked you down enough to secure a kill twice, you pop Satanic’s active, you get your massive DPS in – boom, full life. Simple.
Situational / Luxury Items. (No-Order)
Gleipnir.
“+ 30 Damage + 20 Intelligence + 12 Strength + 12 Agility
Active: Eternal Chains
Roots all enemies in a target 450 radius for 2.0 seconds and deals 220 damage.
Range: 1100
Passive: Chain Lightning
Grants a 30% chance on attack to release a bolt of electricity that leaps between 4 targets within a 650 radius, dealing 160 magical damage to each. Lightning proc pierces evasion.”
If you don’t want to remove your farming item in Maelstrom, and want to make use of the slot, then Gleipnir is the logical next step.
It allows us to keep our extremely fast wave clear late in the game, without feeling like we’re taking up a slot for an item that has long been outshined stats wise by our other slots.
A luxury to be sure, but the root can be extremely potent.
The active is the golden goose. There is no escaping us now, we root them in place, we scutter in, and they’re dead without taking another step. Simple.
Monkey King Bar.
“+ 40 Damage+ 35 Attack Speed
Passive: Pierce
Grants each attack a 75% chance to pierce through evasion and deal 70 bonus magical damage.”
Monkey King Bar, or MKB, screws over evasion. It’s as simple as that. If you’re missing, then all of the little bonuses that we’ve built into our damage, aren’t going off. There’s no crit, no cold, no lifesteal. It just gives your enemy a lot of potential to survive their encounter with you, and the opportunity to counter-attack. We don’t want this.
If they have evasion, we get MKB, simple.
Butterfly.
“+ 30 Agility + 35% Evasion + 30 Attack Speed + 25 Damage”
Butterfly is the ultimate luxury item. It’s a stat stick. It has no active, it just turns the stats we’ve already invested in, up to 11. It’s as simple as that. It enhances what we AGI carries want and need, plus we get a whopping 35% evasion. Kill potential, and evasion, yeah that’s nice.
The enemy has finally gotten close enough, and seen you long enough, to land an attack. Well, that attack now just has a straight up change to do absolutely nothing. Thanks evasion. Now, we return with our HUGE STATS, and kill them.
Thanks Butterfly, that was simple.
Skills.
The Swarm.
“Weaver launches a swarm of 12 young Weavers that latch on any enemy unit in their path, attacking and reducing armor until it is killed.”
Skill at: 4, 13, 14,16
The swarm sends out a wave, that will latch onto enemies and provide you vision and lower their armor until they’ve killed the bug. If they’re killing the bug, they’re not attacking you. If they’re not killing the bug, they’re not escaping your vision and they’re taking big damage with the reduced armor.
This absolutely stacks with your Desolator, and blight stone. Using this early combined with blight stone can surprise a lot of enemies early with just how much your right clicks can do, especially when you’re getting so many out with your Germinate.
Shukuchi
“Weaver shifts out of visibility, gaining bonus movement speed and the ability to ignore the movement speed limit –doing harm to any enemies it passes through.”
Skill at: 1,3, 5, 7
Shukuchi has so much utility, and a super-cool name. Use it to help clear waves with the damage (more with talent). Use it to sneak up on enemies for initiation. Use it to escape damage, and pull out. Use it get around the map quickly. It’s handy in pretty much every situation, and as such we skill it quickly, and take talents that accentuate its versatility.
Geminate Attack.
“Allows Weaver to dispatch two attacks at once. Cooldown: 9, 7, 5, 3”
Skill at: 2, 8, 9, 11
Geminate does exactly as the description says, every few seconds you get a double attack. This double attack applies all your attack modifiers like cold attack, crit chance, etc. Can be used to heavily harass the enemy laner early, time that cooldown with your harass and they’re going to need regen.
Elsewise, there’s not a whole lot more to say, you get a double attack on a three second cooldown when maxed. It’s a powerful passive. Simple.
Time Lapse.
“Weaver warps backward to whatever position it was in five seconds earlier–regaining the HP and mana from that time. No effect on cooldown, gold or experience.”
Skill at: 6, 12, 18
Time Lapse utility is twofold: health/mana and positioning. Taken a nuke and need your HP back RIGHT NOW? Boom, time lapse. Need to pull out escape certain death? Boom, time lapse. Enemy has used dust, and are stacking on debuffs? Boom, time lapse. Need to reposition yourself to secure a kill? Boom, time lapse. Want to get back to the place you died immediately on respawning? Boom, time lapse.
This will make you an absolute nightmare to lock down, as you can purge debuffs, and instantly regain huge amounts of HP. Meaning, you can use it as a save, or just demoralize your opponents with your extra lives. Time lapse into Shukuchi, boom, you’re outta there alive.
Positioning and it’ll save your bacon, simple.
Talents.
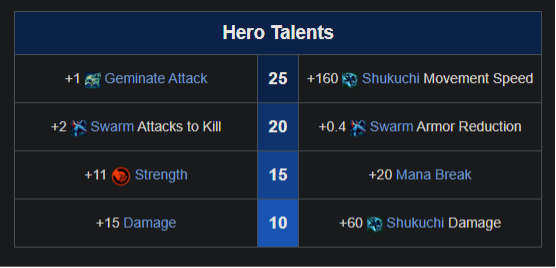
Level 10: +60 Shukuchi Damage.
The other option is +15 damage, and we’re honestly not going to struggle for damage. Weaver has so many ways of accumulating damage through the itemisation we’ve just been through, that it is nearly impossible to turn down the extra utility for Shukuchi.
We’re using it all the time, because it applies to pretty much every situation the game offers up, and now that when we touch enemies or waves, we get a nice little bonus, killing waves quickly too!
Level 15: +11 Strength.
The next one is a far more difficult choice, as the mana break can just absolutely destroy certain heroes, and make life hell for supports. Juggernaut that can’t use omni, or spin? He’s going to be super, super susceptible to your team, and not last long. That is an example of when to take mana break.
However, due to the situational nature of that kind of counter, I find myself opting for strength more often, and thus have recommended it here. A big boost early to our survivability, and combines well with our items that also provide bulk. Meaning that we’re less of a glass cannon, and can stick around longer to be a concrete cannon.
Level 20: +4 Swarm Attacks to Kill.
If they’re attacking the swarm, they’re not attacking you. If they’re not attacking the swarm, blight stone and desolator are reaping them. The longer that they have to deal with the swarm, the more this dilemma is plaguing them.
I believe extending this problem for the enemy is better than an additional 0.4 armor reduction, as we’ve got it from our item also anyway. It’s just not a good enough number not to take the +4 swarm attacks.
Level 25: +160 Shukuchi Movement Speed.
An additional Geminate attack might sound nice, but by this stage in the game, we’ve got the attack speed to be getting out plenty of attacks. It’s a nice boost to your damage for sure, but nowhere near good enough to offset +160 movement speed during Shukuchi.
By this stage in the game, we’re spamming Shukuchi. I mean, spamming it hard. Now, we can be everywhere. We can swap lanes like lightning, get to engagements, get behind enemies, chase like nobodies business, escape like crazy. Our potential to kite enemies just got turned up to 11.
Credits
| Program | Founding Writers |
| Author | Luke Cowling |
| Publisher | MGN |
| YouTuber | Dota 2 P.R. |
| Game | Dota 2 |