Let’s talk about the high DPS Frontiersman build. This is a great setup that will help you get started in New World. It focuses on DPS, mobility, and dealing huge amounts of damage through opening strikes. Basically, by the time enemies get to you, they won’t have much health left and you can easily clean them up. From a PvP perspective, this build is one that will excel at medium to long-range but still has enough firepower to be effective at close range, if needed.
Now as many of you know, mileage will vary with some of these depending on the gear you find and what perks roll on weapons but, overall, this build has been very strong throughout early, mid, and late game. With this setup, you will be able to clean up regular enemies and elites easily without them getting close to you. You can also use this build to farm certain bosses without much trouble.
So, let’s get into the build.
The Frontiersman focuses on Hatchet and Bow as the primary weapons. If you absolutely hate the bow, you can sub it out for a Musket, but just know that you will struggle early on finding ammo. I would recommend you make that switch later once ammo is easier to come by.
This build takes advantage of the flexibility of the Hatchet and its high damage in close quarters. Plus, its utility is incredibly powerful for leveling and being prepared for most situations.
Looking at the skill tree, we are keeping things pretty simple for the hatchet.
We start by taking Berserk to pick up a nice 20% damage buff, then pick up Accumulated Power, which gives us another damage buff when we land three light attacks on the same target. After that, we’ll continue down the chain taking On the Hunt for a movement speed increase while in berserk.
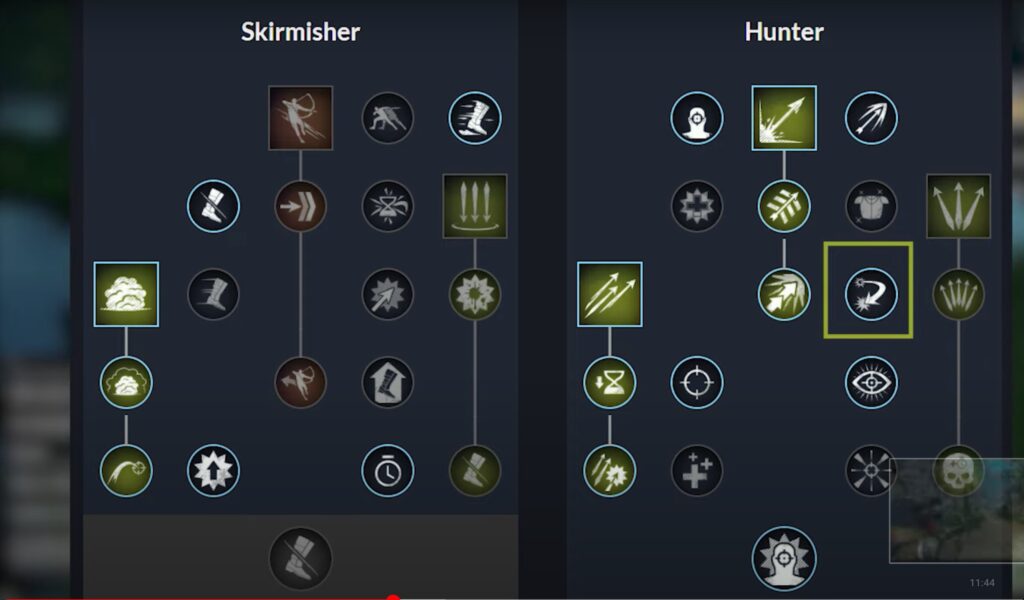
Then we grab Raging Torrent for an extra damage skill.
Next, we’ll pick up Berserking Refresh for a great self-heal when you activate berserk. Then take Rending Throw for some ranged filler. Then back to the berserker tree to pick up Against All Odds, then Fortifying Strikes, then Aggressive Approach, then Final Blow. Lastly, pick up Berserking Purge, Uninterruptible Berserk, Frenzied Purge, Defy Death, and then back around to the throwing tree and grab all the nodes linked to Rending Throw, then Refreshing Throws and Exploitation.
Plus, we take Defy Death for a “get out of jail free” card to help with any sticky situations.
All in all, this hatchet config will give us a great lineup of passives to increase our damage, movement speed, survivability, and some self-healing.
Now, the Bow compliments the Hatchet and will be used for all opening attacks, and with the nodes we’ve taken most things should either die in two shots or be very close to death. The whole focus of this weapon is to deal as much damage as possible on the opening attack and any follow-up attacks. Our goal is to never have to pull out our hatchet.
Let’s break down this skill tree starting with the Hunter.
The first thing we’re going to take is Penetrating Shot. This gives us a quick skill that can be used immediately following our opening arrow, making it a nice one-two punch. This skill also pierces targets, so keep that in mind to avoid aggroing extra enemies.
Then we are going to take Aim True and Long Range, both of which will increase our damage. Aim True will give a 30% damage buff to heavy arrows and Long Range will increase our damage by 20% to foes at least 10 meters away, making for a big damage increase to our opening shot.
Next, we are going to pick up the two nodes connected to Penetrating Shot: Blood-soaked Arrow and Deep Strike. These will increase damage to your primary and pierced targets.
Then we need to get our opening strike node that will give us another 20% damage increase to our heavy attacks against enemies with 100% health.
Next up, grab Rapid Shot for a damage skill to help clean up if enemies run up on you too fast. This is NOT a primary damage skill for us that we need to keep on cooldown, instead, use this if you are fighting fast enemies who will eat all three shots. Otherwise, flip to your hatchet.
After you grab that skill, pick up the two passive nodes on the next tier, Surprise Attack and Arrow Range. Surprise Attack is going to deal another 20% damage to enemies for our opening strike, and Arrow Range is going to let our arrows fly a bit further before they start to drop, giving us some more accuracy.
On our next point, we need to flip over to the Skirmisher tree and pick up Catch Me If You Can for some extra escape potential. This node will give a 20% movement speed buff if you have 3 or more enemies near you. Next, pick up Impale on the Skirmisher tree; this will cause your opening shots to apply a Slow debuff to enemies.
Then, grab Poison Arrow for some AOE and back over to the Hunter tree to pick up the two connecting nodes to Rapid Shot: Rapid Accuracy, and Final Blow. Rapid Accuracy will have a chance to reset the cooldown of the skill and Final Blow causes the last shot of the skill to deal 25% extra damage.
At this point, you should have enough to pick up Concussion. This will increase your headshot damage and give you a chance to get your arrow back.
Our final points should go into the Skirmisher tree to pick up Infected Arrows, Direct Hit, Mark, and Battle Precision, in no particular order.
So, at the end of the day, our first bow shot gets a damage increase of 110% just from our passives and that isn’t including any outside factors. I’ve been able to regularly clip enemies for 11,000+ damage, no sweat.
That covers skills, now let’s talk about gear and gems.
So early on, gearing is very simple. You need to look out for things that are “of the Cavalier” and “of the Brigand”; these will give us a boost to dexterity, which is our main stat, and then a side boost to either constitution or strength. Constitution will give us more health, so go that direction if you want to be a bit more tanky. Strength is the primary scaling stat for Hatchet, so you can take that if you want more hatchet damage.
However, you need to make sure you keep your armor weight to light or medium for the extra damage boost and dodge. If you drift into heavy territory then you won’t be as effective.
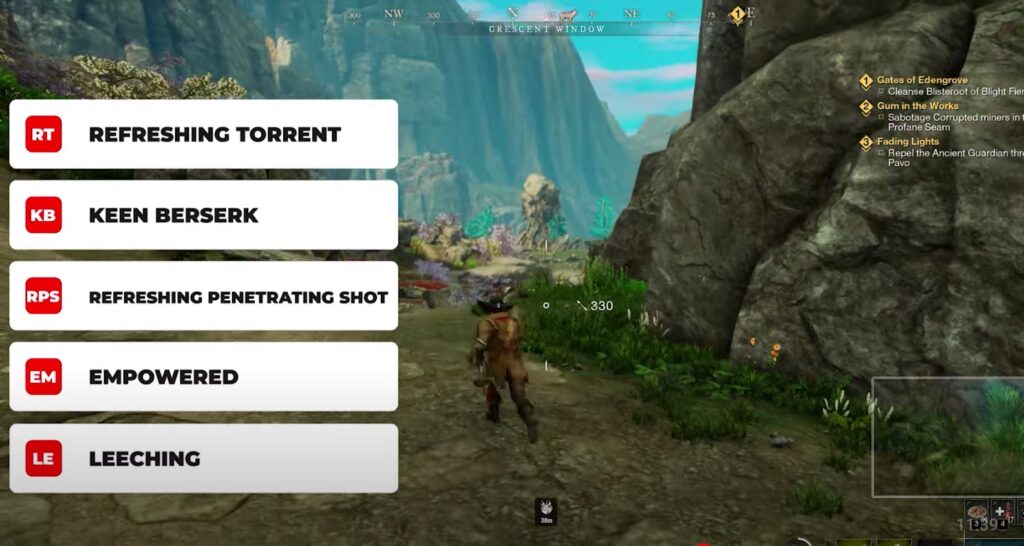
For weapons, look for things that increase dexterity but also keep an eye out for special perks like:
• Refreshing Torrent – this causes each hit of Raging Torrent to reduce hatchet cooldowns
• Keen Berserk – this increases critical chance while under a certain health percentage during berserk
• Refreshing Penetrating Shot – this reduces the cooldown for Penetrating Shot when you kill something with the skill
• Empowered – this causes Empowered to last longer
• Leeching – you gain a percentage of your damage back as health
From a Gems perspective, it’s pretty straightforward as well. Early on, lots of enemies deal slashing damage, so you can slot in Slash Ward or Physical Ward on your armor to protect against that.
I would also recommend slotting in a nature ward gem to protect against disease and poison damage that undead and drowned deal in the early game.
For your weapons, you need to put a Brash gem in your bow as this gives a massive 30% damage increase to enemies with full health and plays perfectly into our opening shot style.
Then for Hatchet, we’re going to slot an opportunistic gem; it will give us a 20% damage increase to any enemy that has 30% or less health. Again, this plays perfectly into our build since the hatchet is used to clean up any enemies left standing after our opening bow shots.
Lastly, let’s talk about attributes.
We are going full Dex to 300 for a chance at ammo being returned and guaranteed crits after dodging. Then we want to put 75 points into constitution, then the rest into Strength for added hatchet damage.
Overall, this build has been fantastic for just about any situation. It’s not overly tanky, but it has a great rogueish play style that rewards dodging, ambushes, and playing fast. So, if this sounds like you, I urge you to give the Frontiersman a shot.
Question regarding the attribute distribution. When you say CON up to 50, is that spent points or if we reach 50 via points spent and gear, do we stop there and then do all DEX up to 300 (with gear) before switching to STR & CON up to 75? Basically, do these numbers mean straight points spent or with gear added?