Divinity: Original Sin 2 is an RPG set in Rivellon, hundreds of years after the original game. It’s brought to the world by Larian Studios who have been lovingly augmenting the original release, years since it’s release. There’s been plenty of free content packs, supported mods, and other little gifted bits and pieces from the studio. These have all been compiled into a Definitive Edition, which is now available on just about every platform that you can think of.
Today we’re going to look at a very specific archer build, wherein the player aims to become as overpowered as possible, as early as possible. This guide is going to walk you through what makes this build possible, how to achieve the results in-game yourself, and what the results will be. So, if you’re in the hunt for an archer build but don’t know where to start, this guide is going to your enemies quaking in fear, and the small-folk of Rivellon quaking in lust. This is MGN’s OP Early Archer Build for Divinity: Original Sin 2.

Step One – Becoming a Crow
The first piece of the overpowered puzzle is the completion of the side-quest entitled “Keep Calm and Carrion”. The earliest this can be completed is act three, so we’ll say that’s the earliest that this build can come together. Though, it can be augmented and improved on later in the game, and can somewhat be achieved without some of the key points earlier. But for now, we’ll stick to Act III being the goal-post.
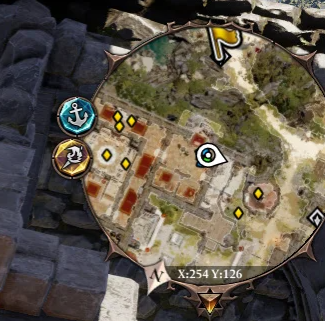
To be the quest, the player will first need read a specific book during their time in the lovely Fort Joy. The book is entitled ‘Dwarven Customs & Traditions’ and can be found within Orivand’s Chambers at the coordinates: X254 & Y126.
The recipes contained within are of little consequence during the first act when they’re obtained, but they will lead to clues on how to continue the quest further on in the game.
The second step is entirely optional, and depends whether you want to fight the boss, or simply talk your way out of the fight. If you want the non-violent solution, ensure that you’re already level 14 and head to the Witch’s house in Act III. If you’re unsure where that is, it’s just a little west of the paladin camp. Inside will be the second book in the Dwarven Customs series, and it will contain the solution for a non-violent approach with the boss.
Whether you choose this route, or are happen to slaughter some fools, you’re going to need to craft one of the recipes from the first book. Specifically, the source-infused meat. If you’re struggling for ingredients, buy some mutton from the meat trader in town, Meister Siva’s basement has the earth essence, and the lich-related sidequest has source orbs. Combine those three and you’ve got the source infused meat for the ritual!

With that taken care of we can head to the ritual site at: X216 Y33. Once you’re there, the ritual site will be quite obvious. It’s the giant square plinth with all the runes and arrows on it, place your source-infused meat there and you’ll summon Duna’s Undertaker. This is where your two resolutions come into play. If you’ve opted for the non-violent solution, and you have the second book, and are at least level 14 – choose the dialogue options:
- 1. receive blessings
- 3. bow with arms outstretched
- 4. quietly request blessings –
- 2. save the souls of the fallen.
This will net the player the blessed feathers they need to craft the badass armor we need for this build. HOWEVER, during your communications with the boss, if you want to go the violent route, absolutely kick that chickens ass, and you can loot the corrupted feathers from its corpse.
With this option all the player need do to save the feathers from their corruption, and allow them to be used for the armor set, is cast bless on the stack and boom, you’re good to go.
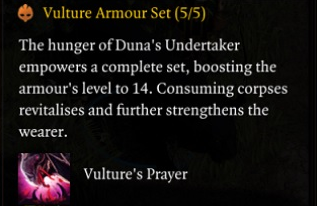
Now that we’ve completed the quest, and gotten the five blessed feathers, all that needs be done is combine those five feathers with five pieces of finesse armor. Doesn’t matter at all what the armor is like, as the crafted result will be brought up in level and given different properties.
Why is this armor set so good for the build we’re trying to accomplish? Great question, glad you asked. Not only are the stats for this set amazing for the point in the game which you can obtain them, but you get a lot of additives as well. And yes, you can upgrade the set during the game with the items from the “Four Sisters Shop” to keep the gear relevant.
What we’re getting additive wise is:
- Permanent Farsight, which increases your attack range by 4M! Great for archers!
- Vultures Prayer – Eat corpses to heal and get a 15% Damage boost
- A huge stats boost to all the important archers attributes
- Permanent wings and a free flight ability
- Perforation passive that adds piercing damage to every attack you do
- Free geo skill in dust blast
All of these things for this early in Divinity, make for one potent archer – gear wise.
Step Two – Combining Stats and Talents
As with basically any build whatsoever in this game, you’re going to want to put stats into memory in accordance to where you are in the game, and how many skills are available to you. That goes without say, but I’m going to say it anyway – no memory, no skills, no damage.
Other than memory, what you’re going to need to put stats into is finesse and wits. I suggest a two to one ratio, two points into finesse for every point in wit. Finesse is self explanatory, but for wit I cannot recommended dumping points enough for a few reasons.
The first is that critical chance is important if you’re not using the Warmafare skill Enrage. The second is that you NEED initiative. Why do you need initiative? Because we’re going to grab the skill:

Glass Cannon: You start every combat round with Maximum AP, but Magic and Physical Armour do not protect you from statuses.
Glass Cannon means that we’re going to be dishing out maximum hurt every single time our turn comes around, but we’re SUPER susceptible to CC. This can be mitigated with the stench talent, and other methods of removing the focus from you’re archer.
But, with that said, we already want wit for the critical chance if we’re not using enrage, and the secondary effect of wit means that we’re always going first. What does this mean? It means that combined with glass cannon (and our gear, and other talents), we’re going to make everything else dead well before it has a chance to CC us.
Talents:
The remainder of your Divinity talents should be spent on the following considerations:
Executioner: “Gain 2 AP after dealing a killing blow (once per turn).”
This pretty much guarantees that you’re getting plenty of attacks in, as you’re always going to be killing at least one thing (if not many more) per turn.
Hothead: “While you are at maximum Vitality, Hothead grants you an extra 10% critical chance and 10% more accuracy.”
Since you’re always going to be going first, you’re going to have hothead active at the start of every fight. More accuracy and more critical chance equates to more damage, simple as that.
Ingenious: “Gives you 5% bonus Critical Chance and 10% extra Critical Multiplier. (Requires human race).”
If you’ve decided to play a human, this one is a pretty important pickup. Everything we do revolves around getting crits, and hitting hard with them – this is a no-brainer.
Other Considerations – Nice to have, but not a must:
Stench, Arrow Recovery, Elemental Ranger, Walk it Off, Slingshot, Far out Man
Skill Points:
As far as skill points, we’re going to want to dump as many as we need for huntsman skills as they become available throughout your playthrough, obviously. What what should we do from there? Another great question, two points in scoundrel for our maneuverability in Cloak and Dagger, then pump point after point in Warfare. Why Warfare? Well it opens up Phoenix Dive as a possibility, but more importantly it’s the best value for point damage increase. So, once we’ve attributed skill points into what we need, then we just dump into Warfare.
Step Three – Divinity Skills That Pay the Bills
The last piece of the overpowered archer build puzzle is using the skills that you have effectively, and ensuring that you’ve got the right stuff on your hotbar. You can have all the right stats, all the right gear, but if you’re not using it all effectively, then you’re not as overpowered as you could be.
The first point is positioning – it’s not always possible to anticipate a fight, especially if you’re on your first few playthroughs. As such, it may be necessary to position your archer on the highground after a fight has started. That, and having good mobility is handy both out of fights, as it is in fights. So, MOBILITY IS FIRST!
We achieve this in a few ways:
- Tactical Retreat – We’ve points in range, obviously, so we can pick up tactical retreat. Use it at the start of fights to gain highground and apply haste to yourself.
- Cloak and Dagger – Use this to reposition yourself if necessary during a fight, whilst tactical retreat is on cooldown, that’s why we dropped two into scoundrel (also we like stats)
- Phoenix Dive – This is your backup to Cloak and Dagger, which is your back up to Tactical Retreat. If a little mobility is good, more must be better.
Now that we’ve sorted high ground, let’s talk about BUFFS BABY. The buffs we’re going to be looking at are:
- Enrage – Does NOT need to be casted by the archer themselves, but this is what makes this build work BEFORE you have 100% crit chance later in the game. Very important early. Use your mobility and buffs, adrenaline for your AP back, enrage yourself (or be enraged), then do HUGE DAMAGE
- Adrenaline – Gives us AP this round, at the cost of AP next round. Like I said earlier, we’re going first and we want to dish out as much as we can as soon as we can
- Clear-Minded – Does NOT need to be casted by the archer themselves, and will add some stats to finesse for the mad DPS (Deeps)
- Vulture’s Prayer – Don’t forget your set bonus buff in Vultures, if there’s a corpse nearby you can eat it up for a huge damage boost, HUGE
- Enrage – I’m putting enrage twice because it goes hard early game
Other considerations buff wise should be around surviving once you’ve dished out the hurt, considering things like Chameleon Cloak or Uncanny Evasion to end your turn. I’m not going to list them as key buffs, because the enemy can’t kill you if they’re all dead.
Okay, so we’ve sorted out getting into position, and buffing ourselves to do maximum hurt, what does that leave? The hurting of course! Next we’re going to look at prioritizing correctly the skills, and which order you should be using them:

- Ballistic Shot – This provides a damage boost of 5% for every metre that distances yourself between the target. As you can imagine, this can get pretty crazy. It’s easily the most useful skill in getting off your executioner bonus, as it can pretty often just one-shot an enemy.
- Sky Shot – I know what you’re thinking. Luke! I’m already at a height advantage with all my mobility skills. True, but what if there’s any enemy also at the highest vantage point? That’s where sky shot comes in. If you’re sharing the highest point in a fight, kill them with this.
- Marksman’s Fang – You’d honestly be pretty surprised how often enemies will conveniently line up for you to get this off. It has better damage than the bouncing arrow, but is slightly more situational. But, the damage is significant, so it’s on the list here.
- Assassinate – 190% Damage if you stealth. Combine this with a guaranteed critical hit, and you’re going to be one-shotting a lot of things. It’s super satisfying and therefore makes the list.
Yes you can absolutely make use for all the marksman skills, but these are my go-to for huge damage. The rest can be situational, or have lesser effect damage wise, but that doesn’t mean they’re useless. Throw them into your fights if you have the memory spare. If not, stick to these.
That’s All Folks
Congratulations, you are now overpowered as hell in Act III of the game. If you follow those steps, you’re going to be murdering things from afar left, right and centre.
If you have anything to add or gave this build a go and either liked or disliked it, we’d love to hear from you on the mgn.gg blog, the YouTube channel, our new Twitter MGN TV, and the new discord! Thank you for checking out our Archer Build for Divinity: Original Sin 2.
Credits
| Program | Founding Writers |
| Author | Luke Cowling |
| YouTuber | Fextralife |
| Publisher | MGN |
| Game | Divinity: Original Sin 2 |