New Player Tips
There are a lot of things new players in Will To Live Online should know. Here are some of the top tips.
The NV-1 will produce better loot from skinning fish than a hunters knife.
You will receive more XP at night than during the day. Also mobs will be slightly harder at night as well to compensate. Note: you wont notice it much though.
Campfires are a one time respawn.
You can send yourself items in the mail.
Use HP Rounds for PvE. Use AP Rounds for PvP. FMJ can be ignored unless your gun does not come with HP (like the SMG90). Then FMJ is acceptable.
You will drop unequipped pieces of equipment at a very low chance.
At night, turn your post processing gamma to 0% and turn on night vision. any other time turn PP Gamma to 50-100%(or whatever u prefer). Your flashlight is a “HEY I’M RIGHT HERE! FRICKING SHOOT ME!” signal.
When you reach the Depot for the first time. you might die for no reason after hearing a woosh noise. these are special webs. throw a nut into one with the N key to get rid of them. or just walk around. these are used mostly in the maze.
DO NOT EVER use the squirrel (unless leveling proficiency %).
For the Compress & Alcohol Deliveries quests just buy the alcohol from the barman and turn it back in. Don’t waste time looking for alcohol in the world.
Radiation will make your health drop and seem like you’re dying for no reason. Wear a Bandana (hit F2 to activate) at all times. For high radiation areas and gas anomalies you can wear a gas mask too fully negate the affects. Bandanas and Masks also allows you to carry radiated items.
Hold your breath with the alt key to walk through gas anomalies and to aim better.
You can place a stash down from your inventory. MAKE SURE TO HIDE IT!
Bring cider with you to stay at full stamina.
If a Small Symbiont jumps on your back and throwing your items on the ground. Pull out your knife, look up, and start slashing to kill it/get it off.
Late game you will be in the canyon. Traveling back to the faction towns stops happening to make profit as u can sell for good $ out there instead.
You can always toggle PvP off till level 15. For those times you run into the lowbie killers hanging around Korovie or Engineering Settlement.
If you don’t want to join a faction you can still make bank off sun spiders in the canyon. Just be sure to sell to the Food/Medic vender in the tunnels. Also dont let factions see you out there as a neutral. You will be shot and killed.
Classes

Class Strength Dexterity Stamina Accuracy Intelligence Fortune Difficulty
Miner 6 4 6 3 2 4 Easy
Hunter 4 5 5 5 2 4 Hard
Mercenary 5 5 6 4 2 3 Easy
Engineer 4 5 5 4 4 3 Medium
Miners: Equipment Reqs 7 Str, 5 Dex
Heavy Armor
The Miner: +5% Crit Chance | +18% Shotgun Dmg | +31% Carry Weight | +21% Resource Drops | +10 Inventory Slots | +10% Leg Break Chance (PvP)
The Big Man: | +5% Crit Chance | +18% Shotgun Dmg | +24% Reduced Damage | +19% Health | -20% Run Speed Penalty | +6% Grenade Launcher Damage
Class Focus: The miner is the tank and the….miner. he uses shotguns and grenade launchers. Has the most hp/def/damage resistance/stam and carry weight. This will be your #1 pick if PVE is your focus. Plus you get to use a rpg.
Hunters: Equipment Reqs 6 Str, 7 Acc
Light Armor or Medium Armor
Hunter: +13% Rifle Damage | +2% Rifle Accuracy | +12% Accuracy | +30% Dmg To Monsters | +15% Environmental Resistance | +10% Chance To Bleed Players | +20% Carry Weight | +20% Monster Loot | +20% Health Regen
Sniper: +13% Rifle Damage | +19% PvP Damage | +8% Rifle Accuracy | +6% Accuracy | +15% Crit Chance | +45% Healing Effectiveness
Class Focus: The hunter is the long range pvp class. Able to wear medium armor. They excel at sniping anyone from range in one or two shots. But will struggle at PvE compared to other classes. Hunters get drop increase and carry weight. Hunters main pro is their L9 Sniper Rifle.
Mercenaries: Equipment Reqs 6Str, 6Acc
Medium Armor
Marauder: +21% AR Damage | +10% Accuracy | +15% Rifle Accuracy | +9% Increased Drops From Players | +8% Reduced Drops on Death | +25% Crit Resist
Stormtrooper: +25% Reload Speed | +25% Crit Chance | +21% AR Damage | +15% Stamina
Class Focus: The mercenary excels at midrange combat. Focusing on crits and reload speeds. They can also loot more from players and drop less when they die. Mercenaries also get to use LMGs.
Engineers: Equipment Reqs 6Str, 6dex, 6int
Light Armor or Medium Armor
Combat Engineer: +10% SMG Damage | +15% PvP Damage | +20% SMG Accuracy | +10% Crit Chance | +25% Item Xp Gain | +20% Explosiion Dmg
Biological Engineer: +10% SMG Damage | +15% PvE Damage | +15% Xp Gain | +20% Healing Effectiveness | +20% Max HP
Craftsman: +15% Item Production Speed | +15% Repair Kit Effectiveness | +5 Crafting Slots | +10% Lockpicking | +10% IHR Healing Effectiveness
Class Focus: The engineer, also able to wear medium armor. Uses smgs for fast close range combat while still being able to let down long range fire if needed. They are the only class who has a skill tree for crafting. Can use equipment like claymores and respawners. Can capture a canyon base. They also get increased explosion dmg, xp, healing and hp pool. Engineers also make the most out of their skill points and can get more out of their skills than any other class.
Common Skills:
+5 Inventory Slots
+15% Carry weight
+15% Melee Damage | +15% Melee Bleed Chance | +15% Melee Crit Chance
+25% Pistol Damage | + 15% Pistol Accuracy | +15% Pistol Crit Chance
All builds in this are focused on using Medium Armor sets. If for some reason you dont want to wear medium as a hunter or engineer you only need 5Str. Most extra stat points are put into Str for HP and Carry weight anyways though. In the end your build is up to you.
Character Parameters
What do your stats do for you?
STRENGTH — Carry Weight, Melee Damage, Max HP, Throw Distance
DEXTERITY — Run Speed, Reload Speed, Interact Speed
STAMINA — Stamina, Max HP, Regen Rates, Status Resist
ACCURACY — Tightens Shot Spread, Decreases Bullet Drift, Decreases Gun Sway
INTELLIGENCE — Increases Kill XP, Gun Prof% XP, Medic XP, Craft XP
FORTUNE — Lock Picking, Dead Drop Chance, Crit Chance, Loot Chance, Crit Resistance
Once level 40 you will have gained 7 points to allocate.Repair ExperienceLeveling up your Repair skill will make repair kits more useful for future uses.
keep in mind all numbers have a hidden decimal. so when you see .07. It could really be .075 and we wont ever know what that number really is.
Mining Proficiency.
So you want to be a Miner. Well I have some good news and bad news. Good news is, there is a easier way from what you probably know. Bad news, it still sucks.
A few things to take note:
Mining Prof% increases the max quantity of resources from each successful gather.
Intelligence doesn’t seem to help mining XP gain.
Mining XP only goes up when you loot a ore with your pick.
Fortune helps your quantity of drops by a slight margin.
Strength makes the ore take less hits to mine, making mining faster.
It should already be a given that Miner is the class to pick for this. After that you just gotta build up 10 str, 5 dex, and 6 fortune. Str is better for mining than fortune. Plus if you max fortune you cant use your endgame weapon. If your so hellbent on a low carry weight and max fortune only go to 9 fortune so you can atleast reach 7 str 5dex.
Now grab your pick, head into the mine, and find a cave in to start farming some mining XP off of them plain old rocks. Fastest way to some is the entrance south of Mine Town by the swamp. Once you drop down the ladder head to the right and a cave in should be right there. Alternatively you can level off of coal in the northern canyon tunnels at level 20+.
Most times its better to kill monsters for the following ores: Lead | Gold | Copper | Coal.
When mining its best to mine for: Silicon | Chrome | Nickle | Coal.
To get iron bars u can buy plates and melt them down or use key 14 at the mine for free sh2 plates to smelt.
To locate the proper ores you need in the Minaevskaya Mine it is best to check the mine ore map guide. There isn’t a better guide out there in terms of finding ore.
Weapon Proficiency

Weapon Proficiency helps increase the overall damage(low end, not the high end), crit chance, and accuracy of your preferred weapon depending on the specific guns proficiency along with that weapon classes overall weapon proficiency %. Some guns also get a faster reload animation at 55%.
So someone who has 100% shotgun proficiency will do more damage than someone with 100% on the spas but only 50% overall shotgun proficiency.
How do I level my weapons the fastest? Make sure every bullet you fire does as much damage as possible. If you fire a bullet that should do 1000dmg and reward 1% xp but only do 500dmg. You will only receive .5% weapon prof from that bullet. To speed things up even more boost INT as much as possible.
This means you must make sure whatever you want to level your weapon on has enough health to take the damage your bullets are going to do. The best monster in the game to farm for pure proficiency/speed for any gun would be the junk/stray boar.
Off Speccing
If you want to use the guns of another class you can. But you will only be able to reach 50% prof. Meaning you cant get a faster reload with a gun that isn’t meant for your class, and you can’t reach maximum damage with a weapon that isn’t meant for your class.
Crafting
Crafting XP: Gained from crafting items in your inventory or at a station.
Places you may smelt ore at: Minaevskaya’s Mine | Zapadnaya’s Mine | North/South bases in Canyon.
Survival XP: Gained from using a campfire to craft.
Cooking your food: It’s always best to go far away from where people normally travel to keep thieves out of your campfire.
At the moment there is no special benefit to crafting/survival xp besides unlocking recipes at % milestones.
Making Your Chitin Armor
You will want this armor by level 20.
To start you will need to gather a few PDAs.
One from the Bandits SW of Korovie.
One from the Cave Spider Boss in the Spider caves.
Two from the Fire Spiders.
You will need to gather Spider Webs, Polymer, fire spider shells, fire spider biomaterial, and alkali from the vender at Zapadanya.
Its best to try and have this armor set done by level 20. This will be the best armor anyone can get unless you can purchase T1/2 Faction armor from a level 3 clan, or Join/get your own clan to level 3.
Person VS Person
End Game Is: PvP
The point of this game is to eventually pick a faction, and fight the other faction over outposts. Being on the winning side gives you various benefits and advantages over the losing side.
New Players & PvP
Some fresh players aren’t ready for pvp. Maybe you’re the unlucky fellow who ran into noob killer whos just going to camp you at a safe zone. To stop this you can toggle PvP on and off from the character overview window in your PDA.
You can only toggle pvp on/off up to level 15. After that you’re fair game.
Neutral Players & PvP
Ultimately you don’t have to pick a faction and you can stay neutral. This causes certain hardships but they can be overcome if you know how to make friends. Neutrals can even make just as much money if you take the extra time to sell to the right NPC.
Ranks
After joining a faction you will gain 1 point for killing a player of the opposite faction within 5-7 levels. 2 points if they are a high enough level above you. Engineers get bonus points for capturing a base. You also will not gain a faction point for killing a player twice in a row.
Each time you rank up you will receive faction rewards in the mail. Engineers also get a reward for each time they capture a base.
We PvP to PvE. We PvE to PvP
Factions
Pros and Cons
Eventually you will do a quest where you need to bring NDP Batteries from the bunker back to solar city. After that if you talk to mikalych again he will ask you if you want to join the Confederation.(If you have also done all the other Pre-req quests) You can tell him no to stay neutral. and Then travel back to Black Sunset to join…Black Sunset.
If you ask people in game you will be given biased answers.
You will be lied to, and you need to THINK for yourself. There are pros and cons to both factions. Many people in game like to paint a picture of one side being better than the other. THEY ARE NOT! The difference between the two factions at the core are…
Confederates
Must use 3 NPCs to sell items for max profit.
Food sold at town.
Does not sell 12ga magnum ammo or fmj xtra ammo types.
Players start in the confederate town.
Fast travel to Kuzmich and back to Noob Town
Fast travel mine town and back to noob town.
Closest to lizard boss.
Closest to Swamp and tunnels.
Has tan/green army colored armors.
Low level board quests.
Generally has the most players due to 1 spamming quest dialog.
Black Sunset
All items sold and purchased from one npc.
Closest to the bunker boss.
Closest to the Boar Boss.
Closest to the Flesheater boss.
Closest to the Spider Boss.
faster teleports to korovie and back.
Does not sell food but has deer spawns(best farmable meat ingame)plus food in the Bunker.
Sells most types of ammo besides what is only sold at korovie/tunnels/canyon.
Closer to better leveling areas.
Closer to roaming trader.
Has black armors.
High level board quests.
Both factions will pay you 84% at their main towns and 90% in canyon for your items. Most pros and cons mean nothing late game. Each side just travels slightly different routes. You just need to find the shortcuts for both sides. In the end its honestly what armor looks best to you.
Rejoining A Faction:
Take 500k to the Roaming Trader west of mine town by the green river on Black Sunset side if you left your faction and want to rejoin.
Air drops
Air drops are loot crates that can be found at the base of a beam of light reaching into the sky. (About 1000m rendering distance) Reach one in time to be rewarded.
The Airdrops can spawn around the main map and coast. Multiple Airdrops can spawn in different zones at the same time.
Loot crates last about 10 mins. When they spawn the beam of light will be a yellow and then start to change to red and eventually the light will go away. The beam of light disappearing indicates the crate is going to explode soon.
If your one of the lucky few who can reach an airdrop in time you can loot.
Assorted s1 ammo types, advanced med kits, stims, titanium powder, skinned guns, and if your really lucky you can get the new magnum .500 which can use the po-1 scope and is bairly short of the damage a l9 produces. (Oh boy is it a beast).
Character Leveling
How XP gain works
Experience Gain in Will to Live Online is all based around your HP vs the HP of the Monster your killing. So say there’s a monster who’s name is red to me and i’m way to low level but i have my friend tanking so i can kill said monster. Because my hp is lower than what im supposed to have when i kill that creature i wont get as much xp as i should for killing it, but only by a few hundred.
Eventualy you’ll catch up in level/hp and get the correct amount of xp. As you level you will gain more hp vs the monster your fighting and start to get less xp. As a lv 44 miner you can be hp build and have a monster be grey to you. Then respec to a fortune build and that same creature will turn yellow.
Level 1-10
There are a few ways you can go about leveling. If you have a friend you can just have them tank firespiders for you. Otherwise you can do one of the following.
First you can just focus on quests. This is what i recommend for new players. Plus you can get a Marauder-5m from quests to use at level 10(It’s better than the level 14 Marauder-5. Also if you give your low level characters your mains M5M the game will not give that character the quest to get a new one. So if you want more than one M5M don’t swap your gun between characters). You will have to go back and do all the quests needed to join a faction anyways. So this method will just save you time as a new player.
Another way to level in the beginning is running east of Noob Town and killing boars. There are a few different areas out there with different level boars the further out you go. Boars are nice for cooking some meat and hearts.
Once you have Gorka Armor you can try out some lizards. Gorka Armor has toxin resistance. At level 8+ Kuzmich also gives a repeatable quest you can farm for XP. Requiring you to kill lizards and making Awl Stimulants. Those stimulants can be sold back in Noob Town for a pretty penny. Better used than sold IMHO though. Also take note this is not a good way to make stimulants later in the gme. Kuzmich will give you a quest for a Pharmasist-k.(located in the quests section) That’s how you want to make stimulants later.
Level 10-20
Once you hit level 10 you should be able to start taking on some fire spiders or hornets. You should have some decent armor and either a Marauder-5m or some other gun you’ve decided to use for your class or what have you. At this point it is best to load up on a good bit of medkits, matches, and the rest ammo.
For Fire Spiders head of over to the Dead Forest(this place is filled with wood). The entrance will be located at I13-6. The Fire Spiders all hang around a black crater in the midle of the map. You must be careful and go in slow. Fire Spiders will easily overpower a lower level player. If Fire Spiders are to powerful its best to try Elder Hornets first.
For Elder Hornets you just need to get a gas mask and maybe a few antidotes just in case. sometimes they can poison you. Head on over to the bunker south of Black Sunset. Grab the safe zone so you don’t have a long run back if you die. You can run around and kill elder hornets as long as you need to untill you can handle Fire Spiders. If you run out of medkits, food, or even antirads. there are antirads just outside the entrance. There is also food, water, meds, and all sorts of ammo inside the bunker to help keep you going.
Another thing you could do while leveling 10-20 is farm Elder Cave Spiders in the Spider Cave, Dead Forest, or at the bottom of the mine. You will want to gather up as much polymer and spider webs as possible from them to craft your Chitin Armor set. The coal they drop is also a big plus.
If you want to maximize your achievements and XP gain. You can always join the faction you don’t want to be with. Complete their quests. Leave that faction, and join the other Faction to finish their quests. Joining each faction is free for the first time.
Level 20+
At this point you should be wearing your new boots and a set of Chitin Armor. Head on through to tunnels and over to the Canyon. There are around 8 spots to farm sun spiders. To fight Sun Spiders effectively you will need Large Medkits, Bandages, and Large Antidotes. Large Antidotes can only be purchased from the faction towns in the canyon.
These will be the best way to level, while also making alot of money. Sun spiders are also the fastest way to make money in the game at the moment.
Level 27+
At this point you can wear faction armor and if you want to solo some Matadors. They will hit hard. You will want to find some that spawn at level 1-4. Only pull one at a time and having a friend with you just incase the level 4s are to hard is always a good idea. This can be faster and also slower than sunspiders. It depends on your gear/class most.
Level 35+
You have your end game gun, your faction armor, and in just a few levels your T2 faction armor set. This is the time you should be pairing up with a friend to duo level 7+ Matadors. One located at F1, surrounded by sun spiders (for some added xp if your strong enough). The second Matador is located at B6-4(this matadors respawn timer was ruined bt the devs), with nothing nearby to agro while farming. With a solid duo each person should easily be getting 10k – 20k a kill. Plus the respawn of matadors is insanely fast.
Faction Quest Requirement List
Quest
Start
Quest Items
End
Location
| Pass an Obstacle Course | Soldier | NA | Soldier | Tutorial |
| Shooting Range | Soldier | NA | Soldier | Tutorial |
| Shoot Steel Stargets | Soldier | NA | Soldier | Tutorial |
| Talk to the camp commander | Soldier | NA | Camp Commander | Tutorial |
| Talk to guide | Camp Commander | NA | Guide | Tutorial |
| Talk to Mikhalych | Camp Commander | NA | Mihalich | Solar City northern building |
| Dialogue with barman | Barman | NA | Barman | Solar City Bar |
| Mushroom Hunting | Barman | 10x mushroom | Barman | Solar City northern region. |
| Rapid Action Group | Vulture | NA | Vulture | Solar City Bar |
| Drinking Water | Vulture | 5x Dirty water | Vulture | Solar City Bar |
| Talk to Rafik | Rafik | Na | Rafik | Solar City Center |
| First Job | Rafik | 10x Rat tails | Rafik | Solar city northern region |
| Acquaintance with doc | Doc | NA | Doc | Solar City Med Tent |
| Flue Epidemic | Doc | 10x Chamomile | Doc | Solar City northern region |
| Glassware breakage | Barman | 5x fork spoon plate | Barman | Picnic table my center building and bottom right area. |
| Vested business | Rafik | 8x rat skins | Rafik | Solar City northern region |
| Fly agaric harvesting | Doc | 10x amanita | Doc | Solar ity northern regions |
| Compress | Doc | 2x Vodka | Doc | Barman or cooler in bottom right of solar city |
| Dog fat | Doc | 10x dog fat | Doc | West side of Solar City |
| Tools | Mihalich | 1x wrench, spanner, screwdriver | Mihalich | Northwest building of solar city |
| Stray dogs | Rafik | 8x dog fur | Rafik | West of solar city dome |
| Alcohol deliveries | Barman | 10x Vodka | Barman | Solar City Bar-Buy from barman |
| Fire extingisher | Rafik | 1x fire extinguisher | rafik | Solnechny Outskirts gas station, B2-2 inside the gas station. |
| Rat King | Rafik | 1x Rat King Fur | Rafik | Outside solar city around D2-8 |
| Anomalous Zone | Mihalich | NA | Anomaly | Solnechny Outskits, B2-2 gas station. Just stand close to the anom for a second or two. |
| Tell mikalych what you’ve discovered about the anomaly | Anomaly | NA | Mihalich | Solar City northern building |
| Postman | Rafik | 1x Box | Mihalich | Solar City northern building |
| Watchers | Mihalich | 5x Watcher Claws | Mihalich | MTE |
| Stashes in anomalies | Barman | NA | Anomaly | MTE, Storage containers TP anom. Stand close to it for a second or two. |
| Chop the woods | Barman | 10x Wood | Barman | MTE has a bunch of wood around the sides |
| Search for metals | Rafik | 10x Ferrous Metal | Rafik | MTE, Chests in the auto shop building. |
| Spare Parts | GunSmith | 3x ferrous metal, plastic, rubber, sulfer | GunSmith | MTE, Chests in the auto shop building. |
| Tell Mikhalych what you’ve discovered about anomaly | Anomaly | NA | Mihalich | Solar City northern building |
| Watcher’s Armor | Rafik | 8x Watcher Armor | Rafik | MTE |
| Lab Carcasses | Mihalich | 10x Boar Bio | Mihalich | East of Solar City my the Cemetery |
| In search of food | Mihalich | 10x Boar Meat | Mihalich | East of Solar City by Cemetary. |
| Coal Passer | Mihalich | 10x Coal | Mihalich | The mine at E7-3 |
| Search of a rat | Barman | NA | Mihalich | Solar City northern building |
| Foreign native | Mihalich | 1x sizys notebook | Mihalich | A little book next to a dead body at C6-9 |
| Ancient key | Rafik | 1x ancient key | Rafik | Train station NW of Solar city. Very NW building in a tipped over desk. |
| Rare electronics | Rafik | 1x microchip | Rafik | Back of a box truck in the SE section of Engineering Settlement. |
Faction Quest Requirement List pt2
| Lost Handgun | Gunsmith | 1x Golden TT | Gunsmith | Grave at the cemetery east of solar city |
| Sizy is not guilty | Mihalich | NA | Mihalich | Solar city northern building |
| Minayev’s mine | Mihalich | NA | Minayev | Minayev’s mine, E7-3 |
| Fells of wild hogs | Mihalich | 6x boar skin | Mihalich | North of cemetery at E3-3 |
| Mysterious buyer | Mihalich | NA | Gosha | Korovie, F12-9 |
| Slacker | Mihalich | NA | Barman | Solar City Bar |
| Information from Barman | Barman | NA | Deserters PDA | A Phone/PDA near a sleeping back in a house a F3-6. |
| Deserters PDA | Deserters PDA | NA | Mihalich | Solar City northern building |
| Hunting the slackers | Mihalich | 1x Slacker Chevron | Mihalich | Train station entrance NW of Solar city, A1-5 |
| Money Trophy | Mihalich | 6x Big boar Fang | Mihalich | South of kuzmich, G3-7 |
| Sanatory Brew | Mihalich | NA | Doc | Solar City Medic Tent |
| Culling of hefty wild hogs | Mihalich | 12x big boar fang | Mihalich | South of kuzmich, G3-7 |
| Herbalist | Doc | 8x chamomile, 6x nettle/rosebay | doc | Solar city C2-5 for chamomile, B5-1 area For nettle, and G3-7 are for rosebay |
| Hope for the forester | Doc | NA | Rafik | Solar city center building |
| Gift for kuzmich | Rafik | 2x vodka, 1x rat king fur | Kuzmich | Kuzmich Border, G2-5 |
| Poison bile | Kuzmich | 7x lizard venom | Kuzmich | Just east of Kuzmich. |
| Deliver the potion | Kuzmich | Stimulator | Doc | Solar city northern building |
| Talk to mikhalych | Doc | NA | Mihalich | Solar city northern building |
| Heart to heart | Mihalich | Mihalich | E8-9 By Spider cave. A camp with a bag | |
| Search of <<Radar>> group | Mihalich | NA | Journal | Spider cave at E8-1. Follow the right wall. Its a small book by a dead body |
| Journal of <<Radar>> group | Journal | NA | Mihalich | Solar city northern building |
| Scouting | Gosha | NA | Radio | West of korovie at D12-5 |
| Dead Snooper | Radio | NA | Gosh | Korovie, F12-9 |
| Last words of scout | Gosha | 2x A1 Batteries | Radio | West of korovie at D12-5 |
| Record | Radio | NA | Mihalich | Solar City northern building |
| Friends of shell shocked | Barman | NA | Barman | Solar City Bar |
| Watcher’s Substance | Kuzmich | 9x watcher ferment | Kuzmich | North of Kuzmich border at G2-2 |
| Stick Situation | Kuzmich | NA | Mihalich | Solar City northern building |
| Sticky situation: Strangers are in the city | Mihalich | NA | Barman | Solar City Bar |
| Stick Situation: Talks in the bar | Barman | NA | Note | A Note on one of the the empty chairs in the Solar City Bar |
| Sticky situation: Note | Note | NA | Gosha | Korovie, F12-9 |
| Sticky Situation: At Gosha’s place | Gosha | NA | Valera | Black Sunset Camp |
| Sticky Situation: Valeria | Valera | 13x Hornet Dust | Valera | Outside Bunker, K9-4 area |
| Sticky Situation: Lost Device | Valera | 1x Electric Pharmacist | Kuzmich | Kuzmich Border, G2-5 |
| Protective Shield | Mihalich | 4x NDP Batteries | Mihalich | Inside of the bunker |
Quests #1
Making the Map:
Map Piece #1: Located in the F3-6 Sobachovka Village. Same place as the cell phone and sleeping bag.
Map Piece #2: Located in the F4-5 Old Ruins Cellar. You’ll need Key #8 from across the street.
Map Piece #3: Located in the D10-5 Strange Place Cellar. You’ll need Key #9.
Map Piece #4: Located in the K5-5 Radio Telescope. You’ll need Key #6 and lockpicks.
Map Piece #5: Located in the H6-4 Sosnovka General Store behind the locked door.
Once you have all of the pieces go ahead and grab yourself some tape from The Garages and put them together with the crafting menu in your inventory.
WayBills At the Depot: RepeatableBe sure to pickup key #50 before you head on into the depot.
Waybill #153: located on a train-car dashboard inside the station.
Waybill #002: Located in the southern most building.
Waybill #069: Top floor of the main building. Second door on the left.
Once you have collected all three Waybills head on back to Minetown and turn in the quest to Scowling.
To Start the quest head to Sosnovka H6-5. The South Eastern most house will have a note with a safe combination on it.
To find the safe you must bring some lock-picks to get into the old general stores back room in Sosnovka.
Next you will want to head on over to the Depot
I-HR 1 Southern most building.
I-HR 2 Southern most building. Same as Room Waybill #002
I-HR 3 Top floor of main building. First door on the right. Same building as Waybill #069
I-HR 4 Located in the western most building. Just jump through the window.
Once all Blueprints are collected head on down into the Tunnels.
To find the easy parts just head on over to Korovie and give the town a good look over. The metal can be found in the strange place cave or dropped from fire spiders.
To find the other parts to the I-HR you will need to collect the parts out of random chests. You will have the highest chances of finding parts in the Bunker, Villages in the Canyon, and the depot. But you can find them all over the map aswell. They tend to be in Chests/Crates/Boxes rather than junk piles.
To Find the NDP Power Amp you must venture out to the radioactive ruins (bring a gas mask). Can be found at L11-9 in a red chest in a corner by all those boxes near the train-cars.
For the Last item. You will need a NDP Detector. and head on over to the Fishermans hut. and have him take you on his boat to gather some NDP materials to finish your battery.
Once you have all that said and done you need only return to Victor with everything + 10k and he will craft you a I-HR.
Three Wise Monkeys: RepeatableThe bronze statuette “Monkey: Kikazaru” can be found at the Cemetery east of Noob Town. Bring a Key [1] or lockpicks.
The bronze statuette “Monkey: Ieszaru” can be found at Little Lakes in H5-5. Its on the fireplace.
The bronze statuette “Monkey: Mizaru” can be found at a bandit camp to the southwest of Korovie in C13-3.
Now that you have that done head on over to the garages and grab yourself some tape.
After collecting everything and have all the items on your person. Open your crafting menu through your inventory and put them together. Now you just need to take the finished item to Scowling at the mine.
The NDP Detector:
The Microchips can be found in the bunker with the nitro. Bring Key#4 or grab it while your down there.
The SBM-20 can be found down in the bunker boss room with the mercury. Bring Key#3
The Microcircuits can be found on computers in the bunker or in the Strange Place Cellar with the Display.
The Body of the NDP Detector will be found in MTE behind the SW door that requires Key#13.
The Display will be found in the cellar outside the strange place. Just be sure to grab Key#9 from the cave.
Now that you got all the parts collected you just need to grab some batteries from any vender, open your inventory, and craft your NDP Detector.
The Stimulator Brewing Appliance: Repeatable
To start the quest head on over to Kuzmich at G2-5
The broken Pharmacist-K is in the hanger at L11-4.
The drawings will be in the main building. you will see a table with some paper on it, the spawn location for these notes moves.
You’ll need some lockpicks Find the door with beds and a red chest. Your tube is inside.
The last item you need is the Flask. this can be found in a safe on its side on top of some rubble.
Now just grab a battery and head on back to Kuzmich.
After you finish this quest you will be able to find parts around the world to craft more Pharmacist-Ks
First thing you need is obviously a Respawner. You can get one of these at any vender.
Next you will need two different Microcircuit Parts. You Should be able to find both of these down inside of the Bunker.
The fourth part you need is a Regulator. These can also be found inside the Bunker.
All of these parts can be found in many different places as well.
Lastly you will need to find a Small NDP Crystal. These can only be found by digging around in the Exclusion Zone with an NDP Detector.
Once you have all of the necessary parts take them all back to Victor Petrovich in the tunnels to receive your Upgraded MRP-1
Nomads Belongings:A quest given to you by Miron at H3-2.
You will find all three items within the same bag located in a clearing at G4-3. Each item will spawn in the bag one at a time. Be carefull though. There is a tornado and a very high level lizard in the area. Both will kill any low level character.
Quests #2
Dangerous Freight: Black Sunset
To find the Poison Containers just run up north to the J4-5 Bog north of Black Sunset.
You will find the red inside the Helicopter.
Blue outside the door of the helicopter.
Green will be by a tree close to the helicopter tail.
Last but not least the Purple will be just a bit north along the edge of the Bog
Once you have all the poison. It’s time to run on over to C4-9 and poison the wells water supply.
Fallen Helicopter: Confederate
Given to you by Mikhalych. You will need to Bring lockpicks. Lots.
Inside the helicopter You will find a 5% chance to lockpick chest.
Inside is the logbook.
Once you have that you can go around to each corpse and find the IDs.
Now that all that is done just run back to Mikhalych for your reward.
Bargin With Gosha & Espionage
Each quest is given from their respective faction leaders. (Victor/Mikhalych)
Your first step to to get the Decoder. Then take it to the radio telescope at K5-5. Climb the stairs and interact with the panel.
To get some gas first you need to get a funnel and gas can.
They can be found in a truck between J5-4 and K5-8.
Once you have those you can find the hose in the cab of a white box truck at the garages in H8-2.
Once you have all three pieces find a red fuel tank around the Radio Telescope to get some fuel.
Now that you have your gas head back to the radio tower and use it on the generator. At this point you will need to protect the generator from waves of monsters. It will start out slow and will get faster. If you fail you need only grab another gascan and try again.
Once you successfully fight off the monsters go back up the stairs of the radio tower and grab the decoder before heading back to your respective faction leader. (Victor/Mikhalych)
KEYS!!!! Alright. Its the best part of any guide. All you need to know about the keys. Enjoy.

| # | Keys That Never Break | Rewards |
| 5 | Found at L11-1 on a corpse. It opens a door on the third floor | Nitroglycerine |
| 6 | Located at K9-3 in the back of a truck. Opens a door at the radio telescope. | Map piece |
| 10 | Found at L11-9 on the fourth floor, on a corpse that’s halfway under a mattress. It opens a door also on the fourth floor. | Mercury |
| 13 | Dropped from AI Humans. A few locations are H6-5 | Around F3-8 Swamp | D5-2 Canyon | D3-1 Canyon. Used to open a door in MTE. | 1985 Red Wine + Charcoal + NDP Body |
| 14 | Dropped from AI Humans. A few locations are H6-5 | Around F3-8 Swamp | D5-2 Canyon | D3-1 Canyon. Used to open an exterior door at Mine Town. | Nuts + SH2 |
| Keys | Also known as #17 and shares the same stack. Found all throughout the world. These keys can open very few doors without needing a lockpick. Two locations are The Cemetary and Engineering Town. | Wood + Monkey Statue Kikazaru |
| 18 | Located in the northern canyon base. In the upstairs of the top left building you will find a wooden crate with a small storage tin behind it. Used at C3-1 to open the front door. Take lockpicks with you. | Tough Guy Stimulants |
| # | Keys That Break When Used | Rewards |
| 1 | Found in the celler at strange place. It is used to open a irradiated and submerged truck at G9-1 | 4 Gold Bars |
| 3 | Found in a bag outside spider cave at E8-9. Opens a red shipping container next to the Bunker boss room. | Mercury + NPD Part |
| 4 | Found at the Bunker boss room inside a red chest. Used on a blue door before Bunker room. | Nitroglycerine + NDP Part |
| 8 | Located at F5-3 in some debris. Opens a celler across the street in F4-5. | 1985 Red Wine + Map piece |
| 9 | Found on a corpse in the back of a cave at D10-5. Used on a celler right outside the strange place. | Key #1 + NPD part + Map Piece + 2004 Red Wine |
| 11 | Found at Mine Town behind a locked door. Used at Zapadnaya Mine in F10-4/5. | Lupara + Mag Shot |
| 15 | Dropped from AI Humans. A few locations are H6-5 | around F3-8 Swamp | D5-2 Canyon | D3-1 Canyon. It is used at H6-6/H6-5 | Charcoal + Non-Ferrous + 1989 Dry White Wine |
| 16 | Dropped from AI Humans. A few locations are H6-5 | around F3-8 Swamp | D5-2 Canyon | D3-1 Canyon. Opens a door in the main radio telescope building at K5-5. | Plastic + Mercury |
| 17 | Found in a red suitcase at C4-9 and used to open a house also in C4-9. Lockpicks can also be used to open the door. | Nuts + Junk |
| 20 | Found in little lakes hut at H5-5. Be sure to bring some lockpicks. Used to open a trailer at the L1-3 Blockpost | Key #21 |
| 21 | Located at the L1-3 Blockpost. It can be put to use at J1-5 Abandoned Camp. Be sure to bring some lockpicks with you. | 2 Gold Bars |
| 22 | Found in the Bomb Shelter inside the house at C3-8/9. You’ll need some lockpicks. Listen for flies on a dead body behind a locked door. It is also used to open a door inside the apartments | Cider + junk |
| 23 | Found in the Bomb Shelter inside the house C3-8/9. Inside a red suitcase. It is used on a door at the top floor of the apartments. | wood + Junk |
| 30 | Located in the Coast at F5-6 on a corpse. Used on a house door at D5-5. | Champagne 1953 + Jewelry |
| 50 | Found at b7-9. Used at the depot to the west. Best to have some lockpicks with you too. | Waybill Quest + Lead Batteries + Crafting Materials + Junk |
| # | Keys That Never Break | Rewards |
| 5 | Found at L11-1 on a corpse. It opens a door on the third floor | Nitroglycerine |
| 6 | Located at K9-3 in the back of a truck. Opens a door at the radio telescope. | Map piece |
| 10 | Found at L11-9 on the fourth floor, on a corpse that’s halfway under a mattress. It opens a door also on the fourth floor. | Mercury |
| 13 | Dropped from AI Humans. A few locations are H6-5 | Around F3-8 Swamp | D5-2 Canyon | D3-1 Canyon. Used to open a door in MTE. | 1985 Red Wine + Charcoal + NDP Body |
| 14 | Dropped from AI Humans. A few locations are H6-5 | Around F3-8 Swamp | D5-2 Canyon | D3-1 Canyon. Used to open an exterior door at Mine Town. | Nuts + SH2 |
| Keys | Also known as #17 and shares the same stack. Found all throughout the world. These keys can open very few doors without needing a lockpick. Two locations are The Cemetary and Engineering Town. | Wood + Monkey Statue Kikazaru |
| 18 | Located in the northern canyon base. In the upstairs of the top left building you will find a wooden crate with a small storage tin behind it. Used at C3-1 to open the front door. Take lockpicks with you. | Tough Guy Stimulants |
| # | Keys That Break When Used | Rewards |
| 1 | Found in the celler at strange place. It is used to open a irradiated and submerged truck at G9-1 | 4 Gold Bars |
| 3 | Found in a bag outside spider cave at E8-9. Opens a red shipping container next to the Bunker boss room. | Mercury + NPD Part |
Bosses
Symbiont:

- Found in the Bunker after going through a teleport anomaly.
- Be sure to bring Large Medpacks, Bandages, and Large Antidotes
- You will have to kite him around and light him on fire with the containers nearby aswell as breaking through his armor to do damage.
- The Symbiont will drop the Modded M7, Nitroglycerine, Mercury, Biomaterial, Fingers, Head, Radioactive Metal Alpha, and Radioactive Metal Beta.
Stray Boar:
- The Stray Boar(Junk Boar) can be found in the h9-9 area.
- Walk backwards while shooting him to keep from getting hit.
- He will drop regular boar parts, his head, and the modded GSH-18.
Spider Boss:

- Found in the Abode of the Papa. The Spider Boss event will only trigger with 3 or more players in the area.
- Be sure to bring Antidotes, Toxin Antidotes, Antirads, and Large Medkits.
- The Spider Boss drops his Shell, Legs, Head, Nickle Ore, Precious Metal, and the Modded MP-133
Flesheater:
- The Flesheater spawns outside the Dead Forest east of Korovie.
- You will need a group with everyone being level 25+. Have a tank to focus on the boss. Everyone els should help keep adds off the tank. Then return focus to the boss.
- If your high level players just crouch side by side, and melt that ♥♥♥♥♥. Ignore the adds.
- Flesheater boss drops various crafting supplies, head, and chitin plate recipe.
- Coast Flesheater drops NDP Crystals + Event rewards.
Matador:
- The Matador Boss Event is west of North Base in the Canyon. This beasty spawns as a lv 15+. Ive seen him as a level 22 even.
- This will take as many strong players as you can gather. and maybe a respawner.
- The Matador Boss will drop regular matador parts and the event will give nice rewards which includes a Desert Camo Paint Can and titanium plates recipe.
Crab Boss:……………
……………
- The Crab Boss will spawn if you bring a group of players to the E1 beach in The Coast
- Must have explosive weaponry to get rid of its armor before it will take damage. Regens armor.
- The Crab Boss drops crab hearts, Cooking pda, and crab skin for the chitin helmet quest.
Honorable Mentions
Bear:- Found roaming the Swamp and in a cave at the Top Left of the map.
- Drops bear parts and the Modded Wolf-357
Lizard:
- Found in a bog just north of Mine Town. He’s Lv. 60 or so. You’ll want to kill him before he can bite you for 600+ damage.
- Drops lizard parts and the Modded Marauder-5.
Modded Guns
| PvP Dmg | PvE Dmg | PvP AP | PvE AP | Magazine | Accuracy | Range | Location |
| 720-1080 | 760-1140 | 45-60 | 58-78 | 5 | 4.0 MOA | 100 | The S&W .500 Special can be found from Airdrops. |
| 90-190 | 90-190 | 5-10 | 5-10 | 7 | 6.7 MOA | 50 | The Modded Nagan can be found off of the Brown Elder Spiders in the Spider Cave. |
| 150-270 | 150-270 | 15-30 | 15-30 | 18 | 6 MOA | 50 | The Modded GSH-18 can be found off of the Stray Boar at his spawn H9-6 or roaming around. |
| 270-500 | 290-535 | 30-40 | 30-40 | 6 | 1 MOA | 50 | The Modded Wolf-357 can be found off of the bears in the swamp |
| 190-340 | 190-340 | 4-10 | 4-10 | 5 | 25 MOA | 50 | The Modded MP-133 can be found off of the Spider Queen in the Abode |
| 110-220 | 110-220 | 15-25 | 15-25 | 30 | 3 MOA | 100 | The Modded Marauder-5 can be found off of the Lizards in the bog at E5-8 |
| 170-360 | 170-360 | 20-30 | 20-30 | 20 | 3 MOA | 100 | The Modded Marauder-7 can be found off of the Symbiont in the Bunker |
| 270-400 | 270-400 | 4-10 | 4-10 | 2 | 16 MOA | 50 | The TOZ-34 #1964 can be found off of the Brown Elder Spiders in the Spider Cave during the Grandaddy’s Guns quest |
| 105-170 | 105-170 | 20-40 | 20-40 | 30 | 2.2 MOA | 100 | The Marauder-5M can aquired once per-account from the gun vender in Noob Town |
| 220-410 | 220-410 | 21-35 | 21-35 | 30 | 4 MOA | 100 | The Lucky Zastava-70 can be acquired from the slots in the tunnels. |
| 250-410 | 250-410 | 35-45 | 35-45 | 30 | 2 MOA | 100 | The Fortune M16 can be acquired from the slots in the tunnels. |
| 750-1050 | 750-1050 | 40-55 | 40-55 | 8 | 1 MOA | 100 | The Fortune Thunder can be acquired from the slots in the tunnels. |
| 470-820 | 470-820 | 20-35 | 20-35 | 10 | 1.5 MOA | 100 | The Lucky Pioneer can be acquired from the slots in the tunnels. |
| 205-330 | 205-330 | 22-35 | 22-35 | 25 | 6 MOA | 100 | The Fortune UMP can be acquired from the slots in the tunnels. |
| 220-320 | 220-320 | 30-40 | 30-40 | 50 | 3 MOA | 100 | The Lucky PMG90 can be acquired from the slots in the tunnels. |
| 225-400 | 225-400 | 4-10 | 4-10 | 12 | 30 MOA | 50 | The Fortune Marauder12 can be acquired from the slots in the tunnels. |
| 350-600 | 350-600 | 9-20 | 9-20 | 8 | 20 MOA | 50 | The Fortune Spas12 can be acquired from the slots in the tunnels. |
If you are going to play the slot machines. I suggest only spending 20k-50k at a time. If you hit a high dollar amount walk away. If you win nothing within that amount walk away. This will keep you from losing all your money at once. This has also given me profit more often than not when playing the slot machines. But if you keep at it they will eat your money.
Maps & Locations
WIP
This is probably the most annoying part. I just have to put time aside to run around and confirm spawns. So please forgive me if im slow with this section. I’d rather take my time and not give incorrect info or give out of date info. If i miss anything feel free to enlighten me.
Teleportation Anomalies:
M1 Teleportation Bunkers:

Solar City aka Noob Town:

Loot
1 Spoons + Nuts
2 Wire + Hard Disk
3 Wire + Spoons + Shells
4 Forks + Plastic Bottle + Glass Bottle
5 Mug + Tin + Comb
6 Forks + Plates
7 Lockpick Blanks + Plates + Nuts + Small Med
8 Spoons
9 Vodka + Plastic Bottle
10 Small meds + 8x18PM FMJ
11 Small Meds + Tins + Beer Cans + Ear-Ring + 20Wood + Tushunkas + Deep Plates + Matches + Regulator + UPS Battery + Ciders + Plastic Bottles + Matches
MTE:

Loot
1-8 Ferrus Metal + Sulfer + Rubber + Plastic
9 9x18PM FMJ + Small Medkits
10 Ferrus Metal + Sulfer + Rubber + Plastic
11 Large Medkits + Random
12 Tushunka + Vodka
13 Large Medkits + Random
14 Beer Can + Lace + Salt Shaker
15 Key of Car + Automotive Fuses + Medium Battery
16 Tins + Glass Bottles
17 12 Ga Shot
18 Bronze Statuette + Small Medkits
19 12Ga Shot + Fuel Can + Medium Medkit + Radio
20 12Ga Shot + Random
21 Shells + Car Wheel Key + Tushunka
22 Beer Can + Bolt
23 Charcoal + NDP Body + Wine
24 9x18PM FMJ
25 9x18PM FMJ
26 Power Supply + Small Medkits + 7.62x38FMJ + Plier Set
Railway Station

Loot
1 Hammer + Plastic + Bandages + 12Ga Shot
2 Medium Battery
3 Pliers + Hammer
4 762×39 + 12GaShot + L Meds + Plastic
5 Keroscene Lamp + Water
6 Large Meds + 12Ga Shot
7 Pen + console + Razor
8 Rubber + P Bottle + Wood
9 Medium Battery + Alot of different junk items
10 A1 Batteries(maybe A2), maybe something els. needs lockpicks
11 Small Meds
12 Meds + Nuts + 762×39 + Plastic + 12Ga Shot
13 I’ve never been able to get onto the highest container to check that chest. Those tele anoms at the station ♥♥♥♥ SUCK!
Artifact, Eclusion Zone, and Maze Locations:

Artifact List:
First thing you will need to do is get some Artifact Containers. They can be acquired from the Roaming Trader in the G7-3 coordinate. You can also grab a Dosimeter while you are there. They are pretty useless for experienced players though.
- First thing you will need to do is get some Artifact Containers. They can be acquired from the Roaming Trader in the G7-3 coordinate. You can also grab a Dosimeter while you are there. They are pretty useless for experienced players though.
Artifact Container Tech Tokens Location - 5 700 Can be found in various locations at the Dead Forest/Swamp
- 10 1,000 Can be found during the night at J3-3 or various locations in the Dead Forest/Swamp
- 10 5,000 Dropped by the Symbiont Boss
- 30 10,000 Through the Teleport Anomaly located in the center of the dead forest.
- ????? ????? The Large Firefly can be found in the game files.
- 25 25,000 Through a Cave/Teleport anomaly in the NW Swamp at A1-8.
- 4 4,000 Exclusions Zone/Maze
- 6 6,000 Exclusions Zone/Maze
- 10 10,000 Exclusions Zone
- 20 20,000 Exclusions Zone
- 15 15,000 Exclusions Zone
- 25 25,000 Exclusions Zone
- 30 30,000 Maze
- N/A 15,000 Through a Teleport South of Mine Town at F10-3. Requires Vodka OR Cider to use the Teleport.
- N/A 20,000 Take a rainbow artifact and nuts with you. Can be found inside a cave you must enter at D1-3 by dropping down the cliffside.
Artifacts are Sold or Used in Clan Quests
Roaming Trader at G7-3 is the only NPC who will buy Artifacts from you
Exclusion Zone:
Gather supplies before you head out. Nuts + Alot of meds + Cider + Food/Water + Nightvision/bandana + Gas mask or Antirads + A Medium Container + A bunch of Small Containers.
Be sure to mark every gavity anomaly. You cant see them but they will make a humming noise if ur about to step on one. You can also throw nuts into them to see where they are.
Nuts are also used for spiderwebs in the maze, aswell as distracting the listeners in the maze.
There are many many more possible locations for blue/red balls but this should get you going and ive run out of map markers.
- Black Dot = Black Orb Artifact
- Purple Dot = Blue/Red Orb Artifact
- Pink Dot = Pink Orb Artifact
- Red Dot = Rainbow Artifact
- Yellow Dot = Sacrifice Artifact
- Doorway = Entrance to Maze or Rainbow Artifact
- Small/Medium/Large NDP Stones and Small NDP Crystals can be found by using the NDP Detector and Sapper Shovel.
Maze Map:
Here is a 100% accurate maze map. After watching people make Garbage and misleading Maps for the maze I have decided i will set everyone straight. There may be some more red/blue balls than indicated but they arent the main purpose of the maze. The crystals are.
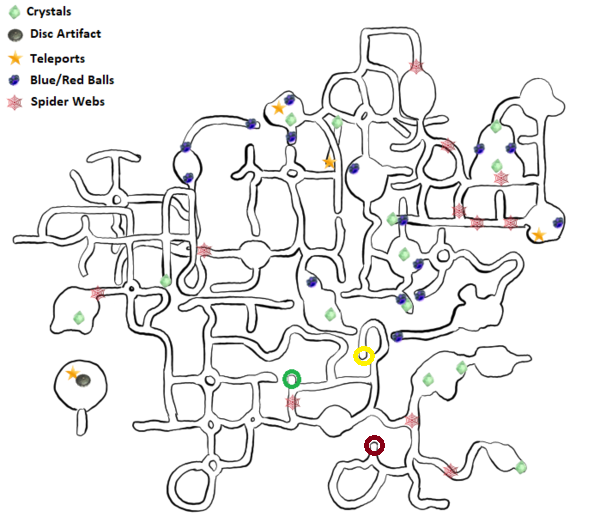
The Electric anomalies and listeners are for you to figure out. They aren’t hard to figure out and the listeners move depending on where they were agroed to last. GL and HF everyone!
In all you should come out of the maze with 14 Medium Crystals and 2 Large Crystals every 24 hrs real time.
There are creatures in the maze called listeners. They will follow you as long as they hear your footsteps. They will react to nuts that you throw. So you are to use that to your advantage to get them out of your way. They are also easily outrun.
Coast
The Coast is the most recent map added into the game for players level 30+. You will need a group to kill most things in this area. Everything will also hit you pretty hard. You wont be soloing this place unless your a miner, hp merc, or hp engi, and hunters just have no place in the coast.
First thing to know about the Coast is you can reach it by going to the dead forest and following the wall to the east untill you find a cave. The back entrance to The Coast is Tihon (fisherman). He will take you close to the town in coast for 5k.
Once in The Coast you will want to go off into a house off to the left and look for a drawer with a note in it. Then you will want to go down the road a bit to a lumber mill. There will be a trailer that has another dresser with the map PDA inside. Open your inventory and install it to get the map for The Coast.
Flesh eater event gives some pretty good loot like NDP crystals.
Crab boss drops crab hearts and a pda. Extremely good for instant heal. 2khp / stam.
Bandits drop .308 M1 DPA.
The Heart artifact can be found in a cave at D1-3. You will need to bring a rainbow artifact and some nuts.
To bring up the shield for the coast you will need 4 NDP Batteries (the ones from the bunker) and a can of gas. You will then need to protect several generators from shocker symbionts for 20 minutes. You get no xp from each kill and the rewards from the event are pretty bad. A clan storage will cost 200k and a personal storage fully upgraded will cost 200k as well.
The stores prices are also increased. For example a 80k gun from canyon will cost 144k in the coast.
Once you get the shield up you can Get a bunch of new quests including the quest to acquire the chitin helmet.
please help me
i only use 4 rifle
fox 100% Proficiency
coyote 100% Proficiency
mosin 100% Proficiency
pioneer 49% Proficiency
why all my average rifles Proficiency only 38.8%
because total proficiency doesnt only count the guns you have used, it counts all of the guns from that class. if you want to max it out to 100% you will need to use every rifle to 100% proficiency, including weapons you plan on never using again.
thanks for the info
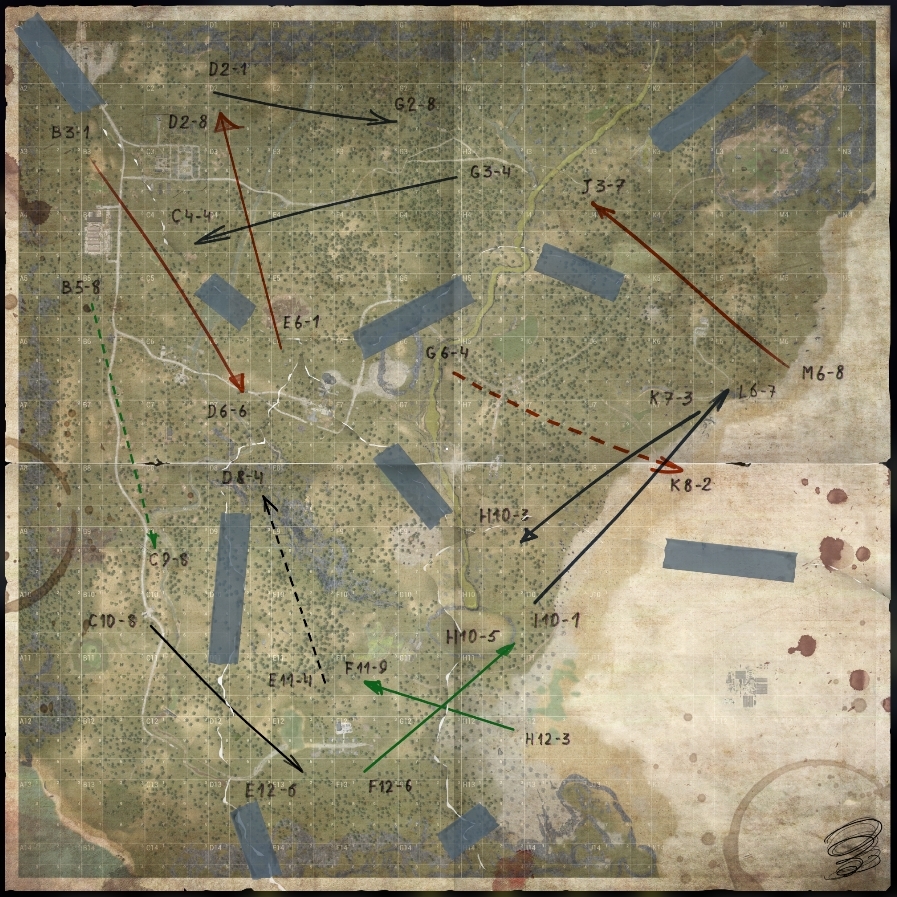
Found out the hard way that Teleport E6/1 is BROKEN will NOT take you to D2/8, even killed all the damned
lvl 3-5 hogs thinking that it only works when not having aggro. I was SOOO wrong and got even MORE pissed off when more than 5-7 seconds later another another half dozen hogs auto-spawned right on top of me only THIS time they were Level 7-15 and colored yellow and RED.
What a bunch of bull**** the devs throw at you in this game!!!
that teleport works just fine for me, i use it almost daily on my mining mule.
There is a fake teleport right next to the real one. It tricks tons of people. The real one is more to the NEW and also not in a ditch.
please need info for example if i join Confederates and not in pvp mode in korovie what Black Sunset player still can kill me??